Bosch- B9512G Setup Guide
The following guide provides steps to configure and initialize the Bosch B9512G panel in the Symphony AC Software. Use this guide as a quick reference. Please contact Senstar Corporation for questions. Considerations Prior to Setup
- The following controller setting must be configured in RPS:
- Automation Device set to “Mode 2”
- The Bosch 9512G panel must have firmware 3.03.014 or later
- Open Port 7700 in Windows Firewall
- If you are using an antivirus program, exclude the Symphony AC installation folder (typically “C:\Program Files (x86)\Symphony AC\Data”) from being scanned by the antivirus program.
Symphony AC Alarm Licensing: Ensure that you have the proper Symphony AC door license if you wish to utilize alarm panels, including but not limited to Bosch panels. Senstar licenses Symphony AC based on the number of doors. For sites that use alarm panels, you will need to purchase the corresponding door license. Please refer to the table below and contact Senstar Corporation (sales@Senstar.com) if you need to upgrade your existing door license.
Symphony AC Door License (Maximum # of Doors) |
Maximum Alarm Panels Allowed |
8 Doors |
1 Panel |
16 Doors |
2 Panels |
32 Doors |
4 Panels |
64 Doors |
8 Panels |
128 Doors |
16 Panels |
256 Doors |
32 Panels |
512 Doors |
64 Panels |
1024 Doors |
128 Panels |
2048 Doors |
256 Panels |
Estimated Import/Download Times Below is the expected download time for the controller.
Bosch Mode |
Time to Finalize the Import/Download |
Mode 2 |
Up to 70 minutes |
Note: On a download all from the Symphony AC software, the panel might become non-responsive as the download or import is in progress.
Setting Up the Bosch B9512G Within Symphony AC
A. Adding the Bosch Driver
- Launch Symphony AC and navigate to the Hardware Manager module. Unlock the module by clicking the “lock” button in the command toolbar. Right-click in the hardware tree pane and select “Edit” to display the “Add Driver” command from the popup menu. Click on “Add Driver” to view the “Add a New Driver” popup menu.
- From the “New Driver” popup menu, click on the “Alarm System Drivers” category. Select the “Bosch G/B Series Alarm Panel” driver. Click the OK
- Select the Bosch driver to display the Driver properties then configure the Protocol field to “2: Mode 2” . You can also change the description of the driver.
- Set the “Service username” and “Service Password” for the Driver. This is typically a local Windows user account that will be used to run the driver as a Windows Service. Click Save. After you save, right-click on the driver and from the Driver Commands select “Start Driver” (See Figure 4). Once the Bosch driver starts you will see the gear icon turn green.
Note: The “Service User” needs to have rights to run Windows services. Usually, an Admin account will have the rights. If using a domain account, enter the full name. In the example below, the full name would be: “SenstarMEX\Administrator”.
B. Adding the B9512G Controller:
- From the hardware tree pane select the Bosch driver. Right-click on the driver to bring up the popup menu. Select “Edit” and then “Add Controller.”
- The "Add Controller" window will pop up. Use the “Manual Setup tab. Here enter the following:
Device Address: This is assigned automatically and cannot be edited.
Controller Type: Select the “Bosch 9512 Controller”
Controller Address: Select the desired controller address
Controller Description: Enter a description name for this controller
Controller Group: Select a Controller Group that has NO other Bosch panel.
Click the “OK” button below to continue.
- Click on the newly added controller to view the properties (see figure 7) and enter the following:
Channel: Click on the drop-down menu and the “Channels” window will open.
Change the following:
Channel: Do not alter this setting.
Port: 7700
Click the “OK” button to close the “Channels” window.
IP_Address: Enter the IP Address of the Panel
Once you are done changing the properties, click the “Save” button and restart the Bosch Driver. To restart the driver, right click on the driver and select “Driver Commands”. Select “Stop Driver”. Right click on the driver again and under “Driver Commands”, select “Start Driver”.
- The controller will now come online. In the “Controller Status” pane, you will see the controller online status, Firmware Version, Driver Version, Date and Time.
C. Importing Data from the B9512G Controller
- From the hardware tree pane, select and right-click on the Bosch controller. From “Controller Commands” select “Import Utility”.
Once “Import Utility” window opens, select all databases and click on the “Begin Import” button. (See Figure 9)
Note: This process can take up to 60 minutes to complete. During this process, the Bosch panel will not report any alarms/events.
Figure 9 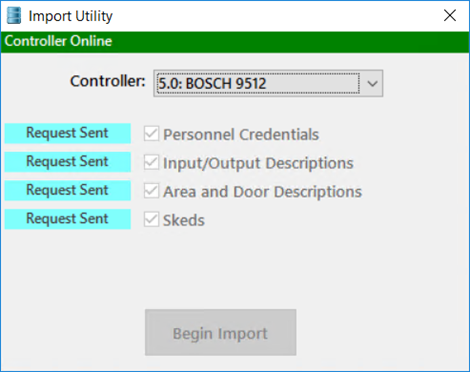
- Once all the databases are imported (i.e. shown in green as in Figure 10), you can close the Import Utility.
Figure 10 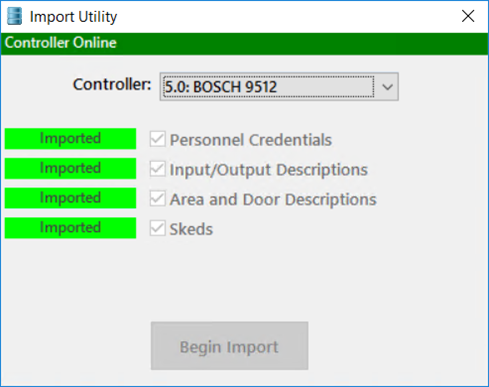
- Select the controller and expand the hardware tree. You should now see the description name next to each device. If you don’t see the status for that device, please make sure the device is enabled. (See Figure 11)
Figure 11 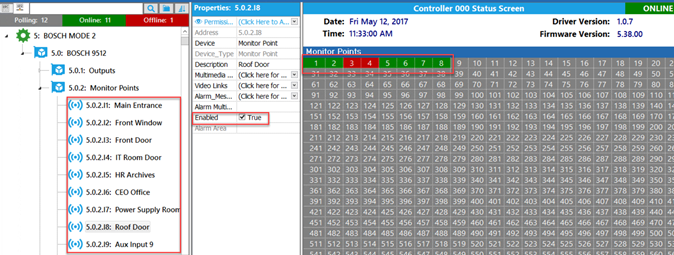 Setup is now complete. To add additional controllers, repeat the steps in subsections B and C for every controller. Note: Each additional controller MUST BE IN ITS OWN CONTROLLER GROUP. Adding more than one Bosch controller per Controller Group will cause database issues.