HID VertX-EVO- Global Lockdown Using an Input
Global Lockdown is the ability to change the lock status for all doors in every controller/sub-controller within the same driver by simply activating an Input. This is a host-based feature meaning that the controller(s) must be communicating with Symphony AC for the Global lockdown to take place.
I. Creating Door Lock Command File
In the Symphony AC Server PC, create a text file using Windows Notepad with the 307 command that will set the specified door locks to whatever mode is configured in the file. Below is how the 307 command should be used to change the state of a door strike: 307 CA SCA DN DSM
- 307= Door Strike Command
- CA = Controller Address that the reader is connected to. This can be a number from 0 to
- SCA = Sub-Controller Address that the reader is connected to. This can be a number from 0 to 31.
- DN = Door Number identifies which of the 2 door strikes on the sub-controller will get affected by the command. 0 or 16 are the only 2 choices for this field where 0 is the first Door Strike, and 16 is the second Door Strike.
- DSM = Door Strike Mode:
- 0-Locked
- 1-Unlock
- 2-Momentary Unlock
Here is an example of the command line: 307 1 0 16 2 In the example above, the command instructs controller 1 to momentarily unlock the second door strike on sub-controller 0. Below is a list of commands to lock the first 2 doors on sub-controller 0 in Controllers 0, 1 and 2: (See Figure 1) Figure 1 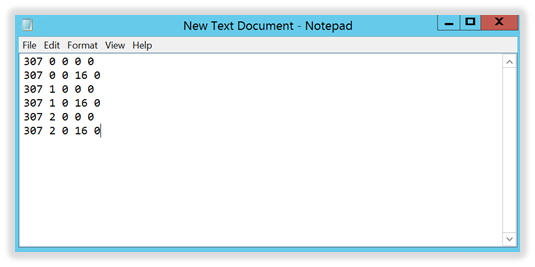
II. Saving the Door Lock Command File
- The file name can be anything as long as the file extension ends with “cm0” where 0 represents the prioritization of the order in which the command should get processed.
- The File must be saved in the Symphony AC commands folder. At default (if you did not install Symphony AC to a different location), the path is typically:
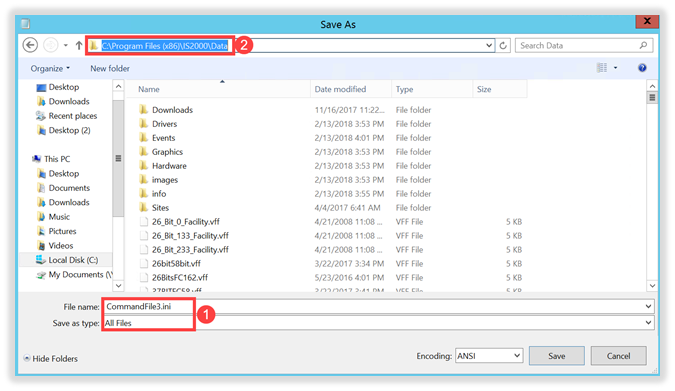
C:\Program Files (x86)\Symphony AC\Data\Drivers\X\Commands X= Driver ID Number. In the example below the driver ID is “3”. Make sure you change the “Save as Type” to “All Files”. (See Figure 2) Figure 2 
- We can also create another file to unlock all of the doors. From the example above, we can simply copy all of the data from the “lockHID.cm0” file, create a new text file and paste the data. To do so, change the last digit for each 307 door command (which represents the DSM- Door Strike Mode) from a “0” (locked) to a “1”(unlocked) and save the file.
III. Creating the Command File to Execute Lockdown from an Input (VertX / Edge)
To execute the command file we created in Section I, we need to create a Command File to link it to an input. When linked to an input, the file will get executed and perform whatever actions were specified in the file whenever the input goes active. Create the Command File using Windows Notepad. Below is an example of what a CommandFileX.ini would look like: [1.0.0.I16] File=Test.cm1 In the example above, the command file ‘Test.cm1’ will get executed when Input 1.0.0.I16 goes active. Please note that multiple inputs can be added to the same “CommandFileX.ini” file and can be used to trigger the same or different command file(s). Below is a Command file that will execute the “lockHID.cm0” file when Input 3.1.1.I9 goes active. It will also execute the “UnlockHID.cm0” file when Input 3.1.1.I10 goes active: (See Figure 3) Figure 3 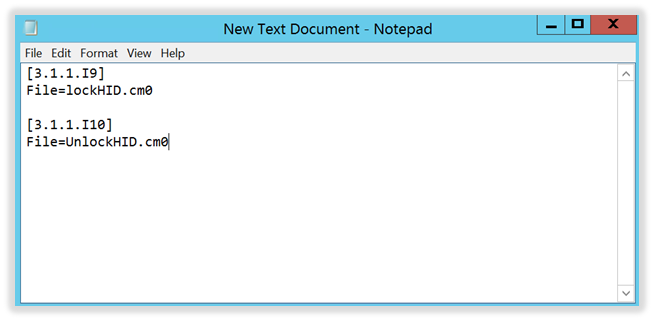
IV. Saving the Command File to Execute Lockdown from an Input (VertX / Edge)
- The file name must be “CommandFileX.ini” where X represents Driver ID number where the input(s) is located.
- The File must be saved in the Remote Path of the Symphony AC Server. Typically, this path is:
C:\Program Files (x86)\Symphony AC\Data Change the “Save as Type” to “All Files”. (See Figure 4) Figure 4