HID- VertX Anti-Passback
What is Anti-Passback?
When Anti-Passback in enabled, the HID/VertX master controller and all readers connected to it via sub-controllers are aware of the cardholder’s whereabouts. When an access granted event is generated, the user is moved into the “Area” where the reader has been assigned to. The user can then present their card to any reader from the next “Area”, but cannot present it again to the same reader. By preventing the card from being used on the same reader, once a person enters the area, they cannot pass their card back to another person to gain access on the same reader.
A. Configuring Anti-Passback in Symphony AC
- Start Symphony AC.
- Click on the “Access” module and select “Occupancy Control”. (See Figure 1)
Figure 1 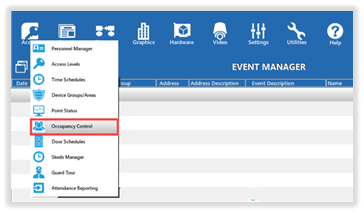
- The “Access Areas” window will open (See Figure 2):
a. In the “Access Areas” dropdown menu, select the controller that has the readers where Anti-Passback will be configured.
b. In the “Access Areas” pane click on an “Area” that will be used.
c. In the “Properties” pane, rename the area by editing the “Description” field. Do not change any other properties.
Note: You will need to complete steps a through c for each “Area” that will be used. When finished, close the “Access Areas” window. Figure 2 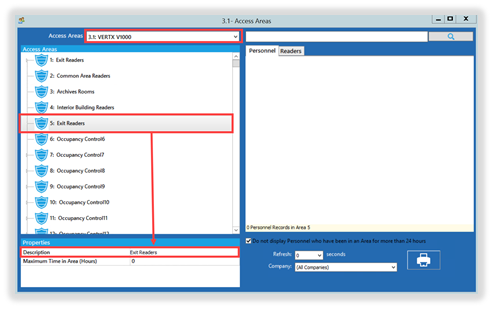
- Navigate to Hardware Manager and unlock the module (i.e. click the lock icon). (See Figure 3)
Figure 3 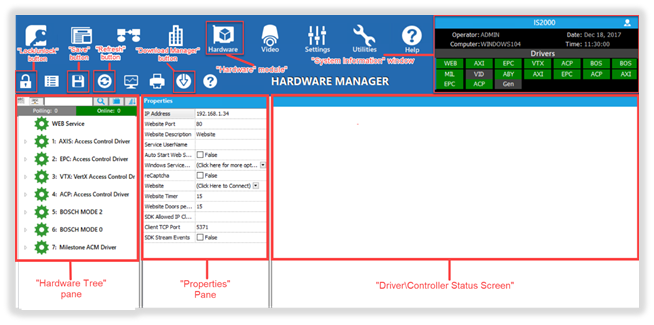
- Expand the hardware tree list down to the reader for which you configured Anti-Passback. Locate the “Anti-Passback” field under the properties pane. (See Figure 4)
Figure 4 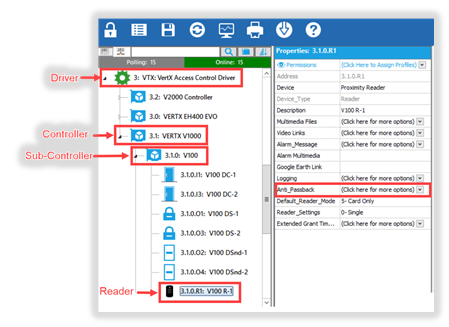
- In the properties pane, click on the “Anti-Passback” field and the “Anti-Passback” window will open. (See Figure 5)
Figure 5 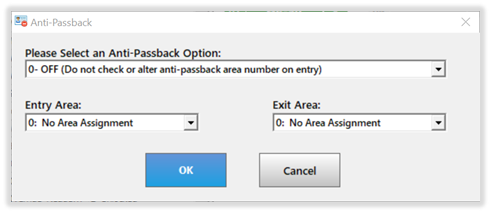
- In the “Anti-Passback” window do the following:
Please Select an Anti-Passback Option: (Select one of the following)
0 – OFF (Do not check or alter Anti-Passback area number on entry): This option is used when no Anti-Passback is present; this is the default installed mode.
1- Soft Anti-Passback (Do not check area number and change on entry): This option is used to move the card holder from one area to another without altering the Anti-Passback area number. This option will not prevent a card holder from entering the same area twice, but will alert the administrator that a Passback violation has occurred.
2 –Hard Anti-Passback (Check area number and change on entry): This option verifies the last area of the card holder to ensure that the card holder has not presented to the same reader twice. The card holder must present to designated readers and be granted access in sequence to avoid a Passback violation.
Entry Area:
This designates the area number the card holder will be moved to when they get access granted at this reader. Do not select “0”.
Exit Area:
This designates the next area that the card holder may enter. Do not select “0”.
Click “OK” to save changes. (See Figure 6)
Figure 6 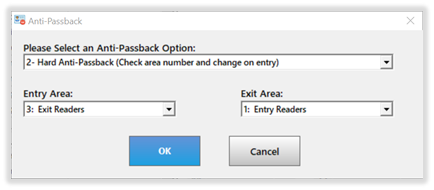
- You will be prompted to download changes, click “Yes”. (See Figure 7)
Figure 7 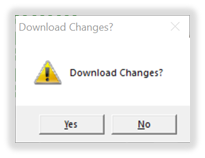
- Configure Anti-Passback on other readers by repeating steps 5 through 8 above.
Note: You MUST configure at least 2 readers.
B. Forgiving a Card Holder in Passback Violation
If option 2 “Hard Anti-Passback” option is configured and a card holder is getting “Access Denied: Passback”, that card holder’s record will need to be forgiven for access granted to be achieved. Go to Personnel Manager. (This can be accomplished by clicking on the Access module and selecting “Personnel Manager”.)
- Unlock the module to allow editing of the screen.
- Find the card holder record.
- Once the card holder record has been located, click on the Advanced tab.
- Check the box labeled “Allow one free Anti-Passback” to forgive the card holder record and then click Save. (if the box is already checked, uncheck the box, then re-check the box and click Save)