Upgrade Server-Clients
Upgrading Symphony AC Server
Prerequisites:
- Have an active Maintenance agreement with Senstar.
- If the Symphony AC Server does not have internet connection, please request the “Maintenance.SID” file from Senstar by emailing support@Senstar.com. Include your Symphony AC Serial Number in your request.
- Access to Symphony AC Server computer
- Windows User account used to start Symphony AC Drivers/Services MUST have log on rights to the Symphony AC Server
- Access to SQL Database (If applicable)
- Access to ALL Symphony AC Clients (If applicable)
- Symphony AC Upgrade software (Either the CD or “Symphony AC_Upgrade.exe” file)
- Current version of Symphony AC must be 10.3.X or newer. If using 10.2.x or below, please contact support@Senstar.com.
- Temporary disable/turn off any Anti-Virus software
- Perform a manual backup from the Backups and Archives Utility in Symphony AC
Notes:
- The latest version of Symphony AC supporting Bosch Panels running Mode 0 or 1 and using access control is Symphony AC version 10.2.48. Do NOT upgrade to any later version, as it will not work.
Upgrading Symphony AC Server/Clients
- Log in to the Symphony AC Server with the Windows User account used to start the Symphony AC Service and/or Drivers. If using “Local System Account”, make sure the logon user is a local administrator.
- Close all Symphony AC applications/services. (Verify the application and all Symphony AC Drivers are stopped in Windows Services and Task Manager)
- Close ALL Symphony AC Client connections.
- From the Symphony AC Server, backup Symphony AC by doing the following:
- Login to the SQL Server and launch the SQL Server Management Studio.
- Expand the “Databases” tree and select the Symphony AC Database.
- Right-click and select “Task” then “Back-up”.
- Review the backup settings and click “OK” when ready.
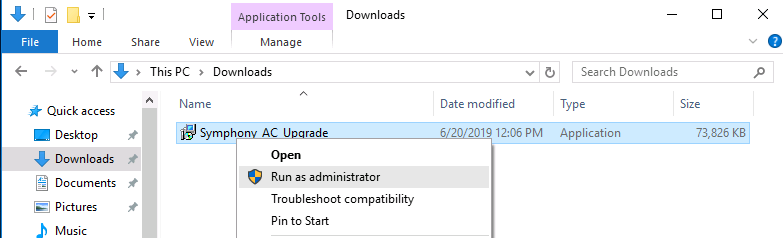
- Run the Symphony_AC_Upgrade.exe file on the Server using the 'Run as administrator' option.
- In the 'Welcome to the Symphony AC Setup Wizard', click Next
Once the window opens displaying the following message “Setup has finished installing Symphony AC Upgrade on your computer”, copy the “Maintenance.SID” file into the “Data” folder located inside the Symphony AC installation folder (Typically: “C:\Program Files (x86)\Symphony AC”).
7. Click on the “Finish” button to complete the upgrade and start Symphony AC. If you are running Symphony AC as a Windows Service, you MUST uncheck the box that reads “Launch Symphony AC” and start Symphony AC from Windows Services.
8. Once Symphony AC starts, verify data and functionality (Personnel Records, Access Events, Door Commands, etc.).
9. Once you have verified that the system is running normally from the Symphony AC Server, you can proceed to run the Symphony AC Upgrade on ALL Symphony AC Clients
10. Upgrade has been completed.