HID- VertX-Edge Controllers Setup Guide
The following guide provides steps to configure and initialize the HID VertX or Edge controller panel in the Symphony AC Software. Use this guide as a quick reference. Please contact Senstar Corporation for questions. Considerations Prior to Setup This guide will assist you in setting up the HID VertX, Edge, and V2000 controllers in Symphony AC. Please ensure that you have the correct firmware version for your HID panel. Refer to the chart below for a list of panels and corresponding firmware requirements. 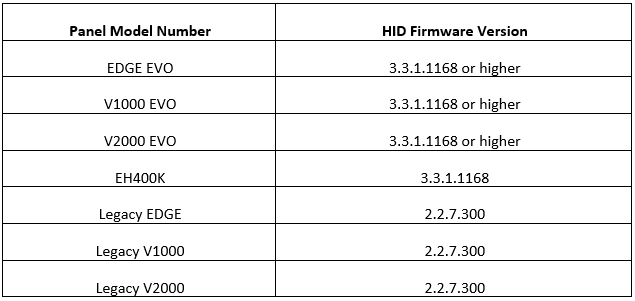 Setting Up the HID VertX/Edge Hardware I. Accessing the Network Page of the HID Controller
- Connect the HID Panel to the Network.
- Perform a direct connect to the controller via cross-over and a PC/Laptop.
- Open a web browser and go to: http://169.254.242.121 (See Figure 1)
Note: In order for a connection to be established, the computer must be on the same subnet as the controller. In this example, the PC is set to IP address 169.254.242.100
- Enter “admin” for the username and “Senstarcorp” for the password. Click “OK”. (See Figure 1)
Note: If you do not successfully log in, leave the password field blank. Figure 1: 
- Once you have logged in, click on “Advanced Setup” to configure the network settings. Senstar recommends that you DO NOT use DHCP. Select “Static” and enter a valid static IP address, subnet, and default gateway. (See Figure 2)
Figure 2: 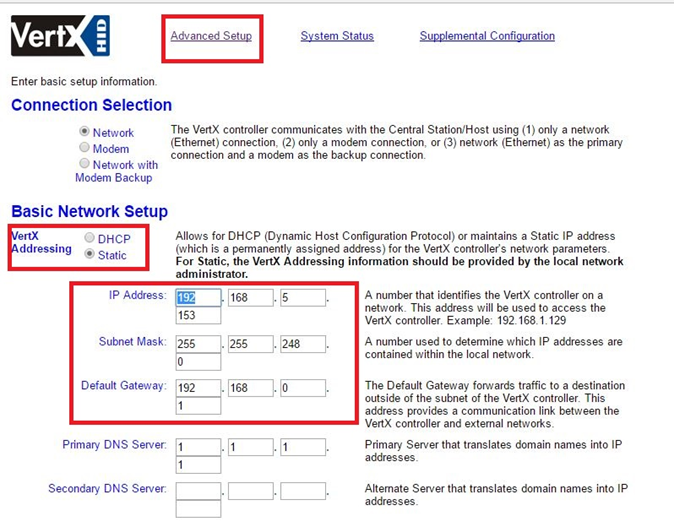
- Ensure that the following parameters are set to “YES”:
“FTP Enabled”
“SSL Enabled”
“Virtual Port Enabled”
Telnet and SSH should remain disabled. (See Figure 3) Note: Depending on the firmware and hardware that you are using, not all options may be available. The SSL and SSH options are not available if you are using the new EVO current firmware for the HID hardware. (i.e. in Figure 3) If these options are not enabled, please use the settings above for the options that are available to you. In Figure 4, the SSH and SSL options are available. Figure 3: 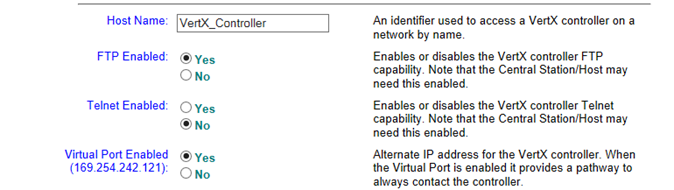 Figure 4:
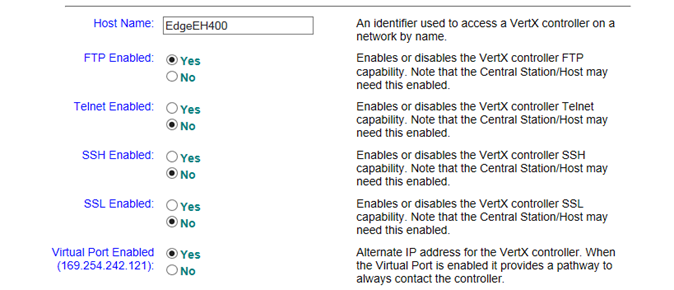
- Enter the IP Address of the PC that will be running the Symphony AC VertX/Edge software driver into the “CS/Host Addressing” field. Set the “Here I Am Interval” to “20”. Keep the TCP/IP Connection Port as default (4070) and the TCP/IP Listen Port as default (4050). (See Figure 5)
Figure 5: 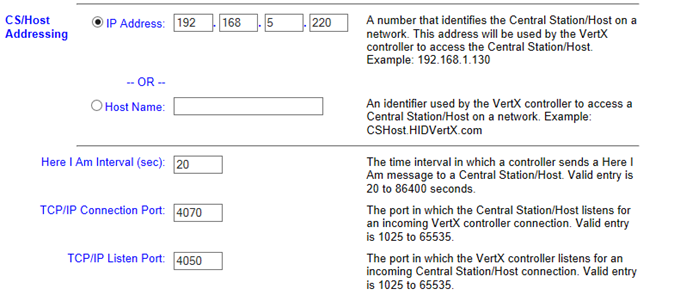
- When connecting to a VertX/Edge controller via WAN/LAN, please note the following:
a. From the VertX/Edge controller perspective, note the IP address it sees the PC that is running the Symphony AC VertX/Edge software driver. This is the IP address that should be entered into the CS Host property for each controller. (Check your IP address via the command prompt and match it to the one entered into the CS Host property.)
b. Port forwarding of 4050 and 4070 may need to be enabled in the router if you are going across different networks.
c. Ports 4050 (PC to VertX/Edge) and 4070 (VertX/Edge to PC) need to be unblocked for the routers and the PC that is running the Symphony AC VertX/Edge software driver.
Firewall settings: enter the Windows Firewall With Advanced Security. You need to create 2 inbound and 2 outbound ports. (4070 and 4050)
d. From the PC that is running the Symphony AC VertX/Edge software driver’s perspective, what IP address does it see each of the controller(s)? This IP address should be entered as the IP Address property for each controller in the Hardware Manager in Symphony AC.
- Click “Save” to save your changes. (See Figure 6)
Note: You don’t have to reconnect to the controller once the changes have been saved. Close the web browser. Figure 6: 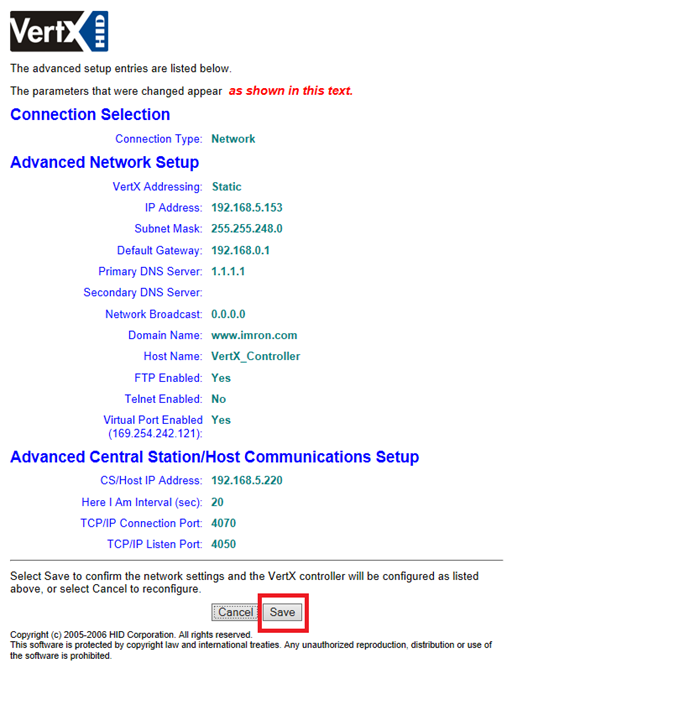 II. Setting Up the HID Controller in Symphony AC
- Launch Symphony AC and navigate to the Hardware Manager module. Unlock the module by clicking the lock in the command toolbar. Right click in the hardware tree and select “Edit” to display the “Add Driver” command from the popup menu. Click on “Add Driver” to view the “Add a New Driver” popup menu. (See Figure 7)
Figure 7: 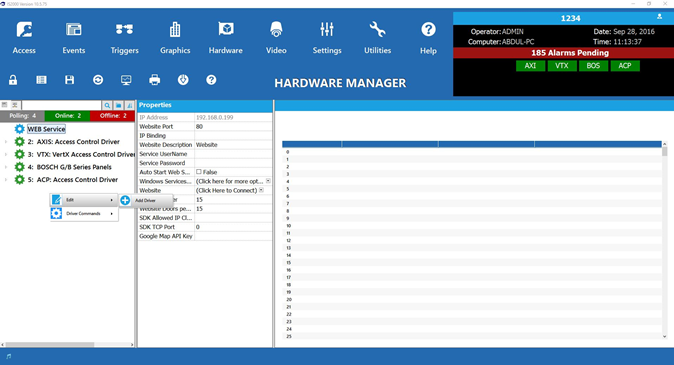
- From the “New Driver” popup menu, click on the “Access Control Drivers” category. Select the “VertX/Edge HID Access Control” driver. Click the OK (See Figure 8)
Figure 8: 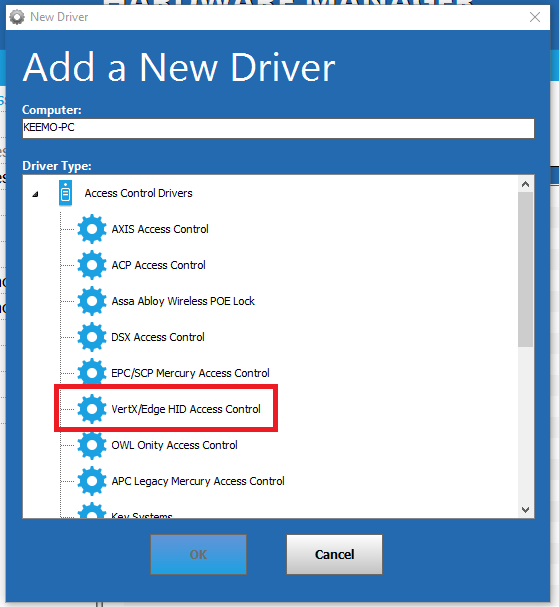
- Set the “Service Username” and “Service Password” for the Driver. This is typically a local Windows user account that will be used to run the driver as a Windows Service. Click Save. (See Figure 9)
Note: The “Service User” needs to have rights to run Windows services. Usually, a local or domain Admin account will have the right to start or stop services. If using a domain account, enter the full name. For example, the full name would be: (DOMAINNAME\YourUsername). If you are having difficulty starting or stopping your Windows services, please contact your IP department. Figure 9: 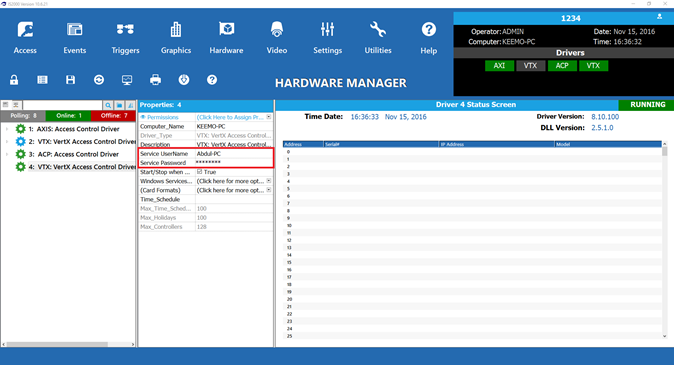
- Select the driver from the hardware tree. Right click on the driver to bring up the popup menu. Select “Edit” and then “Add Controller.” (See Figure 10)
Figure 10: 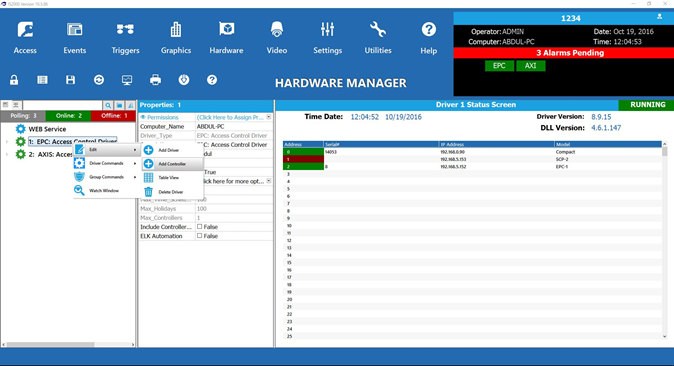
- There are two ways to add a controller. Controller(s) can be added manually one at a time or you can scan the network and add controllers.
a. To scan the network to add controllers, use auto setup and check the box next to the controller with the proper IP address that you wish to add.
- Note: More than one controller can be added simultaneously using the Auto Setup tool.
- Note: If using the auto setup tool, controllers can be viewed in the auto setup tool if they are in the same subnet. If you scan for the controllers with the auto setup tool but cannot see the controller, it is likely that the controller’s IP address is set out of the server’s reach because they are not on the same subnet. If this is the case, you will have to add the controller manually.
OR
b. In the alternative, you can manually add controllers by using the manual setup. Select the controller type (here, the appropriate HID controller: VertX, Edge, or V2000 Controller). Select the Controller Address from the drop down menu and the Controller Group from the drop down menu.
b. Click the “OK” button below to continue. (See Figure 11)
Figure 11: 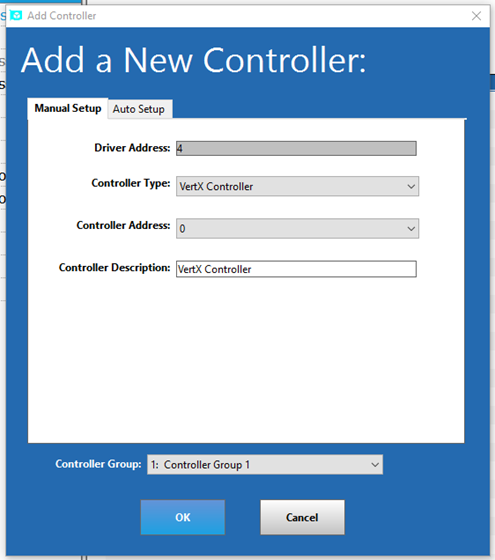
6. Starting the Driver: Select the Driver in the hardware tree, right click on the driver, and select the “Start Driver” item from the “Driver Commands” menu. (See Figure 12)
Figure 12: 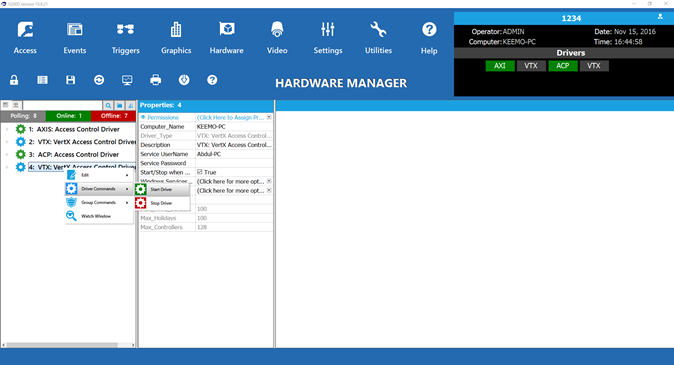
- Once the driver starts, a green box showing “VTX” will appear in the information window in the top right. The Driver Status Screen should display “Running” in green along with the Time Date of the Driver, the Driver version, and the DLL Version. (See Figure 13)
Figure 13: 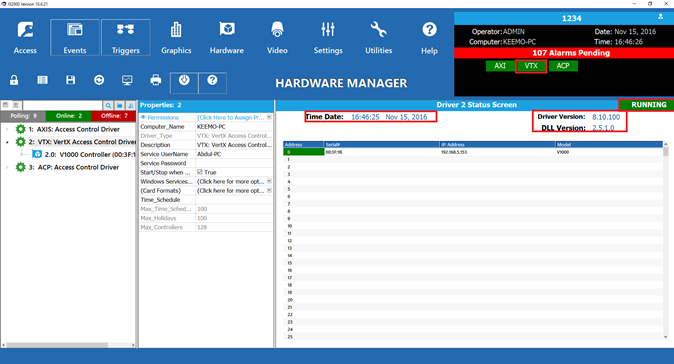
- Expand the hardware tree and select each device to set properties. Click on the Save command from the command toolbar. The Controller Status screen should appear with a green “ONLINE” status. (See Figure 14)
Figure 14: 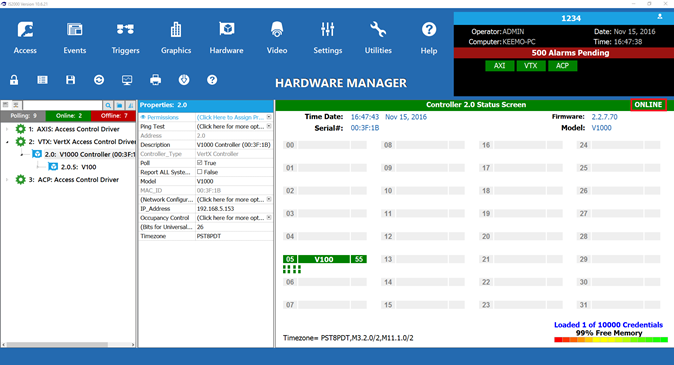
- Once you are ready to download to the controller(s), click on the Download button located on the command toolbar. Select the VertX/Edge controller(s) to download to. Ensure that the database items are checked. Click on “Begin Download” to initiate a download to the selected controller(s). (See Figure 15)
Figure 15: 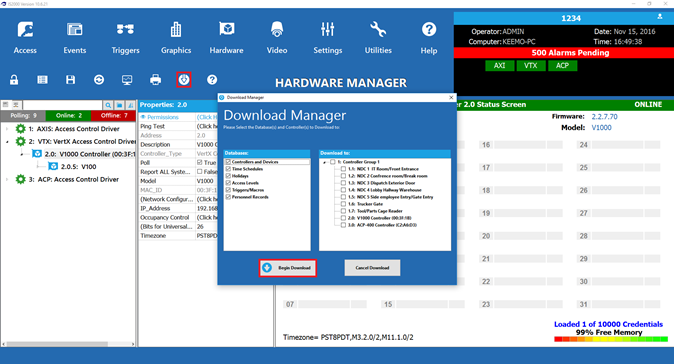
- Once the download process to the controller has been initiated, you will see a progress bar that will also give you an approximate timeframe for the download to complete. (See Figure 16)
Figure 16: 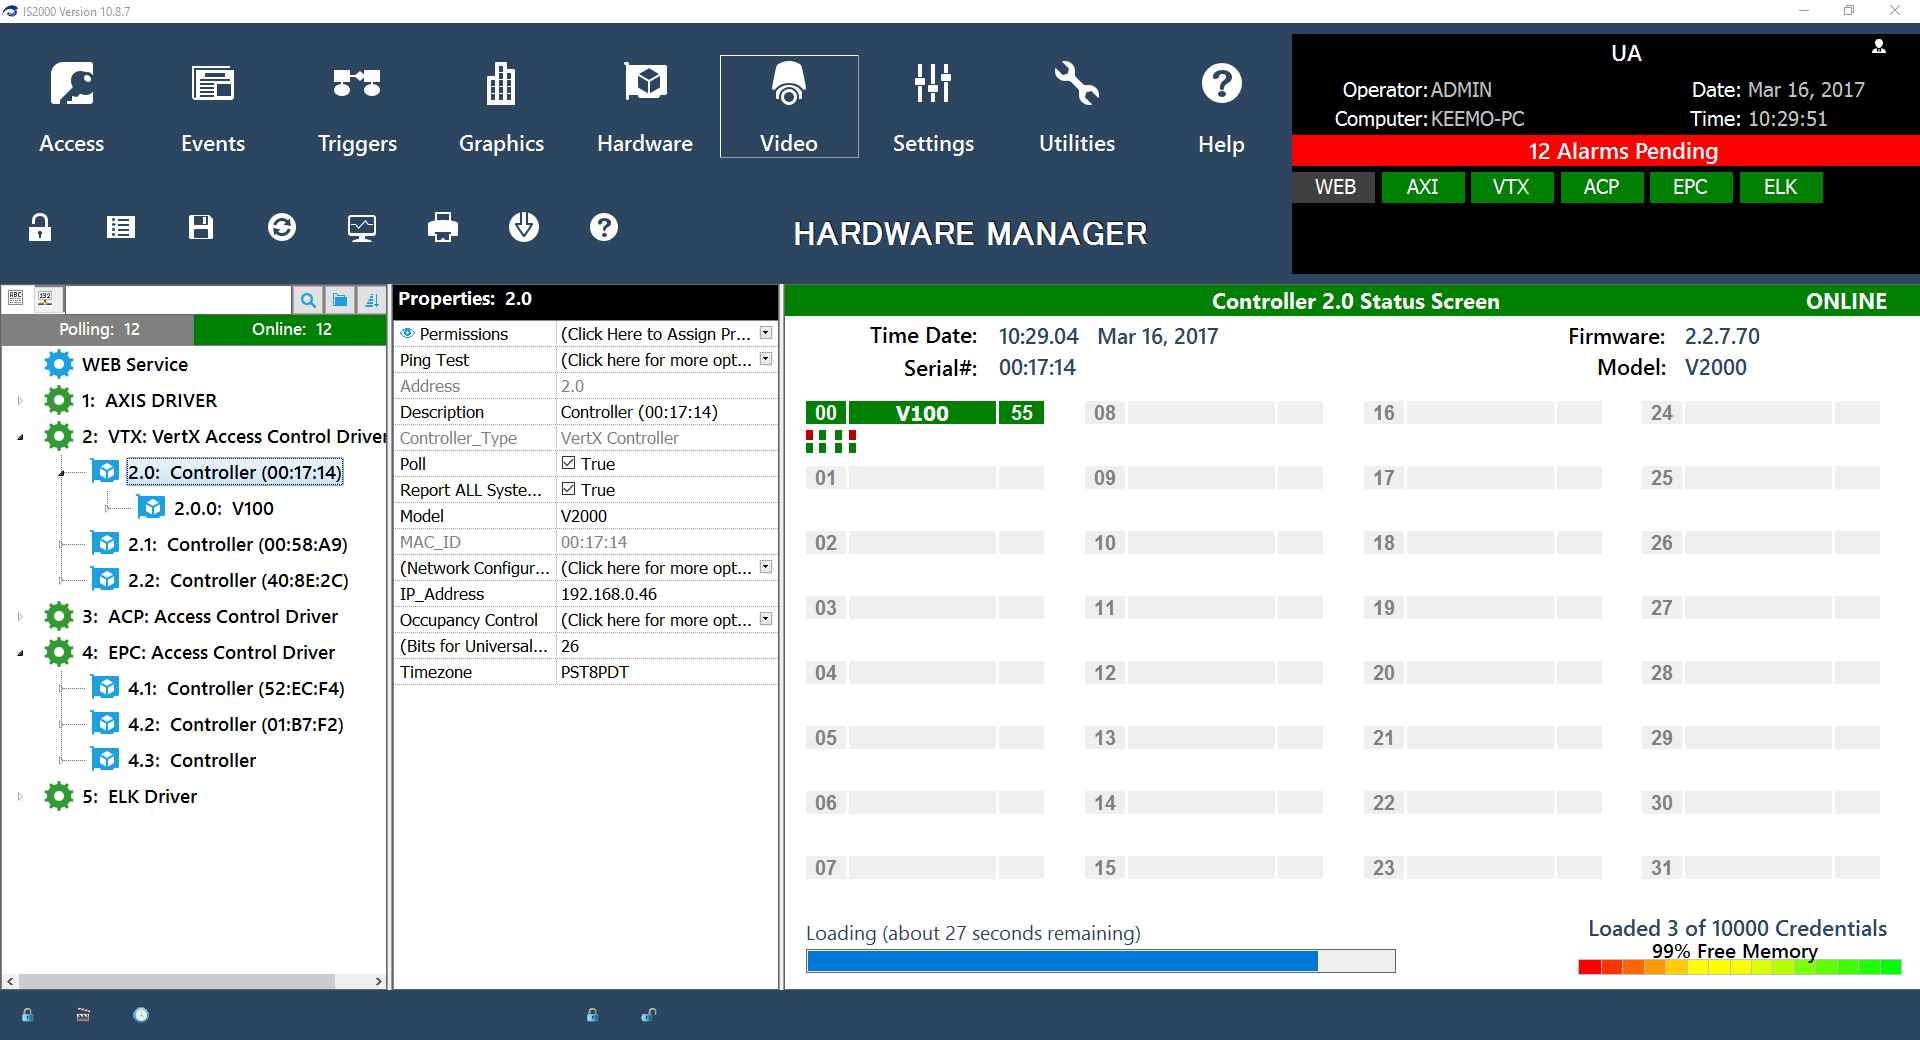
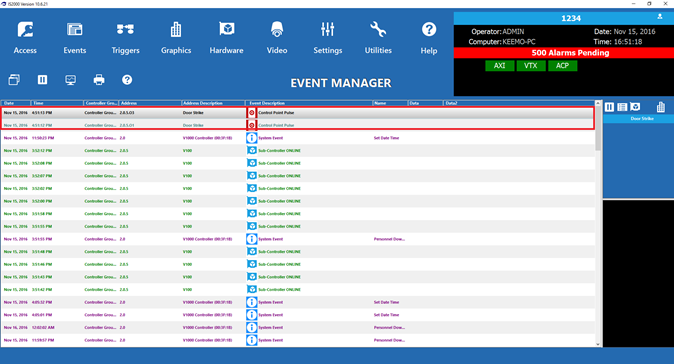
- Right click on a Reader to test Unlock/Lock Commands. Events will now appear in real-time on the Event Manager. (See Figure 17)
Figure 17: