Door Contact Properties
Door Contact Properties
Door contacts are used to determine the position (opened or closed) of the door. By default each reader module assigns at least one (1) door contact. Depending on the type of sub-controller two (2) door contacts may be shown in the hardware tree. The door contacts are generally address points I1 (input 1) and I3 (input 3). I3 will only be shown if the reader module is multiple reader capable.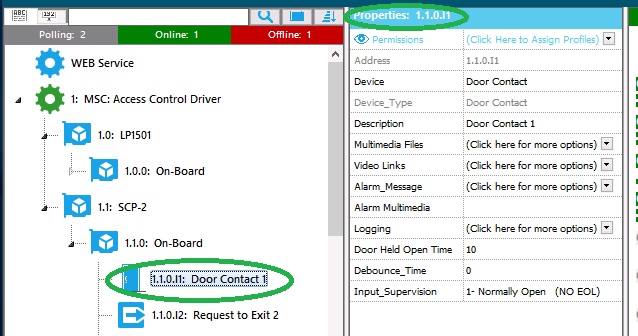
- Address The physical address of the door contact is automatically assigned within the Access Control Security Application. If the reader module has two (2) readers the addressing for the door contact will be I1 for reader one (1) and I2 for reader two (2).
- Device_Type - The type of device attached to the sub-controller. There are six (6) different types of devices and include; Reader, Monitor Point, Control Point, Door Strike, Door Contact and Request to Exit (REX). The Device_Type may only be changed once the point has been disassociated through Door_Definitions located under the readers properties. The ability to change the Device_Type is only available for the Aero hardware platform. To modify the Device_Type highlight the reader from the hardware tree. Click on the drop down arrow to the right of Door_Definitions and set the door contact value to None. Highlight the door contact, click the drop down arrow to the right of the Device_Type flag and select the Device_Type from the pick list.
- Description A description of the device, used to easily identify the location or function of the device. The description will display on Event Manager any time an event occurs at that point.
- Multimedia Files Video / Media that can be associated to the device and called up by right-mouse clicking on the events related to this device. To associate a Multimedia File, click on the drop down arrow to the right of the Multimedia File tag. Click the plus sign to add a new multimedia file. Click on the field to the right of “Description” to add a description. Click the drop down arrow to the right of the Multimedia tag and browse to the location of the saved multimedia file.
- Video Links Associate a camera to certain events of this device. Used to setup recording on a particular camera during particular event(s). Please note that the Access Control Security software must be licensed for the video module in order to utilize this feature. The camera must be previously configured for use in the system before the camera can be assigned to a point. For video configuration options, please see help section Video Configuration. To associate a video link to the door contact, click on the drop down arrow to the right of the Video Links tag. Click on the drop down arrow to the right of the Camera Address tag and select the camera to be associated to the point. Please note that the use of video by event is only available for certain manufacturers. If the model used does not support this functionality, the camera will display for all events. Contact Technical Support for information regarding what manufacturers this is available for.
- Alarm_Message A text field that is associated to the device when it goes into alarm state. This text field should be informative in describing what type of alarm has occurred. To create an Alarm message, click on the drop down arrow to the right of the Alarm_Message tag. Type the custom message in the text field provided. Click the green check mark to save changes. To exit without saving click on the blue x.
- Alarm_Multimedia The sound that will occur when the alarm goes into an alarm state. Note: this feature requires the use of a sound card and speaker installed on the computer. To select the Alarm_Multimedia for the device, click on the drop down arrow to the right of the Alarm_Multimedia tag and select a wave file.
- Logging Allows for device specific logging, select the related event then select a Log Type.
- Door Held Open Time Specify a time in seconds that will generate a Door Held Open alarm once the time has expired. The Door Held Open Time begins after the access grant time has expired. A Door Held Open only occurs after a valid card read has occurred and door has been propped or the contact did not see a closure and the Door Held Open Time expired. The Door Held Open time is configurable up to 4000 seconds. To select a Door Held time, click on the drop down arrow to the right of the Door Held Open Time and select the desired time.
- Debounce_Time A sensitivity setting for inputs. A low debounce setting requires the system to receive this number of consecutive reads from an input prior to reporting a change of state.
- Input_Supervision Determines if the input will be wired normally open, normally closed, with or without End of Line resistance (EOL). When a door contact is present, generally the door contact is wired normally closed. The default state for a door contact in the software is normally closed. If no door contact is present, the technician will be required to set the supervision to normally open to avoid unnecessary alarms.