Data Import Utility- CSV
You can use the Data Import Utility to import personnel records into Symphony AC from many different sources, significantly reducing the amount of time required to configure personnel records in Symphony AC. The most common source of import is done via a CSV file.
Prerequisites:
- Symphony AC Operator must have ‘Admin’ profile
- CSV file
Import Options:
- For a one-time import, complete section I through II
- For multiple imports from the same file, complete sections I through III
- For automatic import, complete sections I through V
I. CSV File Data Validation
A. Open the CSV file and verify that all the information is valid. Each column will be mapped into Symphony AC as a separate field (First Name, Last Name, Employee # etc.). (See Figure 1) Only the following characters should be used:
- Letters (AbCfG)
- Numbers (158511)
- Periods (.)
- Hyphen\Dashes (-)
- Backslash, Forward slash (\ /)
- Parentheses ()
- Email characters (@ _ ! )
NOTE: DO NOT USE COMMAS as it will display any information after the comma in a separate column. Figure 1  B. Make sure the CSV file is saved as ‘CSV (Comma delimited) (*.csv)’. (See Figure 2) Figure 2
II. Data Import Utility- Mapping and Importing
A. Open Symphony AC. B. Click on the Utilities module and select ‘Data Import Utility’. C. Once the Data Import Utility application opens, complete the following steps: (See Figure 3) Step 1: Select a Source Data File.
- Type: Select ‘CSV’.
- Filename: Browse to the CSV file.
Step 2: Preview the Data File.
3. Click on the ‘Preview’ button to preview the file. Select/check the ‘Ignore First Row’ box if the first row in the file is used as headers.
Step 3: Personnel Field Mapping
4. Map all applicable fields. (Note: it is not necessary to map fields that don’t need to be imported.)
You can save the mapping for future use by clicking on the ‘Save Map’ button.
To open a saved map file, click on the ‘Open Map’ button and navigate to the file.
5. Click the ‘Begin Import’ to initialize the import.
6. Once the import completes, you will see the following notification: ‘The Data Import Completed Successfully’.
Note: We highly recommend that all records to be imported have 1 column with the same value and/or assign a Personnel Template that existing records in Symphony AC (if any) don’t have. This way if you make a mistake on the import, you can filter by this field/template and delete all the records at once. Otherwise, you will have to delete 1 record at a time. Figure 3 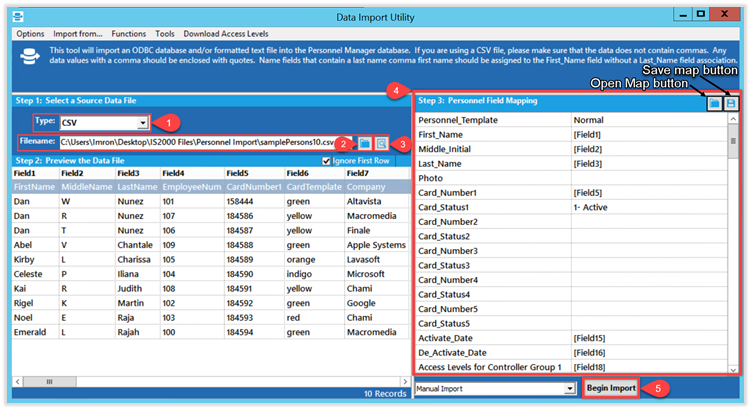
III. Configuring Indexing
You can import from the same CSV file an unlimited amount of times, but may result in duplicate records. To avoid creating duplicate personnel records after every import, you MUST index by a field that is unique to each record(row). For example, you can index by ‘Card Number’, ‘SSN’ since those fields should be unique for every personnel record. Once you index by a specific field, if the data for the selected field (i.e. ‘Card’ or ‘SSN’) already exists in the Symphony AC database, the information for that record(row) will be updated and a new personnel record will not be created. If there is no unique field for the record(row), we highly recommend you create one by using a field that is not being used (i.e. Employee #, SSN) or a ‘Custom Field’. To index by a field, complete the following: A. Open Symphony AC. B. Click on the Utilities module and select ‘Data Import Utility’. C. Once the Data Import Utility application opens, complete the following: (See Figure 4)
- Click on the Options tab.
- Click on ‘Index Based on Personnel Field’.
- Select the field that will be used for indexing (Note: make sure there is a checkmark next to the field).
Figure 4  D. Continue with the import procedure.
IV. Configuring Scheduled Import
You also have the option of configuring automatic imports either by a time interval or daily. You MUST use indexing to prevent adding duplicate records. To configure automatic import, complete the following: A. Open Symphony AC. B. Click on Utilities module and select ‘Data Import Utility’. C. Once the Data Import Utility application opens, complete the following steps: (See Figure 5) Step 1: Select a Source Data File
- Type: Select ‘CSV’.
- Filename: Browse to the CSV file.
Step 2: Preview the Data File
3. Click on the ‘Preview’ button to preview the file. Select/check the ‘Ignore First Row’ box if the first row in the sheet is used for headers.
Step 3: Personnel Field Mapping
4. Map all applicable fields (Note: it is not necessary to map fields that don’t need to be imported).
You can save the mapping for future use by clicking on the ‘Save Map’ button.
To open a saved map file, click on the ‘Open Map’ button and navigate to the file.
5. Click on the ‘Schedule’ dropdown menu and select the time interval you want to use. To import daily, select the last option, ‘Auto Import every Day’.
6. The next import date/time will be displayed in the date/time box next to the ‘Schedule’ dropdown menu. You can edit the date/time of the next import.
Figure 5 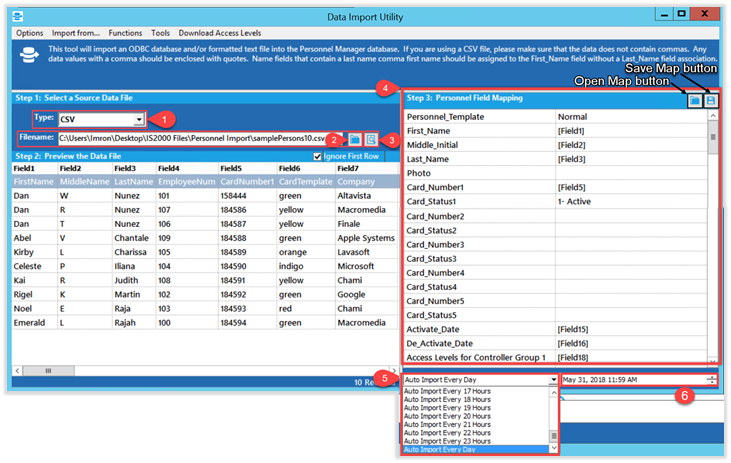
V. Configuring Automatic Download After Import
After you import personnel records into Symphony AC, you MUST download the Personnel Records database to all controllers for the changes to take effect. If you configure automatic import and don’t want to do manual downloads each time, you can configure automatic download by completing the following: A. Open Symphony AC. B. Click on Utilities module and select ‘Data Import Utility’. C. Once the Data Import Utility application opens, complete the following: (See Figure 6)
- Click on the ‘Options’ tab and select/enable the ‘Hide Message Boxes’ option. (Note: Make sure there is a checkmark next to the box)
- Click on the ‘Options’ tab, then click on ‘Download Personnel Record During Import’ and select either ‘Full’ or ‘Single. ‘Full’ will send all records at once while ‘Single’ will send single record downloads.
Figure 6 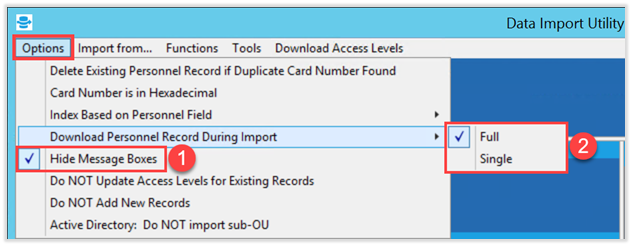
VI. Troubleshooting
Issue: File preview displays all information in 1 column. The file was not properly saved, and/or the data was entered in 1 column Issue: Information is not displaying in the correct field of the Personnel Record. The mapping was not done correctly. Issue: There are duplicate personnel records after the import The import process was done multiple times with no indexing. Issue: Imported records multiple times by accident, need to delete copies. It is not possible to delete only copies and thus the easiest way to fix this is to delete all the imported records and then import again. To delete all the imported records, filter by a common field (i.e Personnel Template, Custom 1) and verify that only the records you want to delete are displayed. Use the ‘Group Edit’ button to delete all displayed records and import again. Issue: Cards are not downloading to the controller(s) after the import. Cards must have an Access Level assigned to get downloaded to controller(s) Issue: Only 1 Access Level per Controller Group Imported to the Personnel Record Access Levels for the same Controller Group must be separated by semi-colon ‘;’