Converting MS Access Database to SQL
This guide will assist you in converting your Microsoft Access database to a SQL database.
Advantages of Migrating to SQL:
- Larger capacity to store data - MS Access has a 2GB limit while SQL 2014 Express has a 10GB limit.
- Symphony AC backups do not shutdown Symphony AC - With SQL, Symphony AC Backup jobs can run without taking down Symphony AC.
- Eliminate the ‘Data’ folder share dependency for Symphony AC Clients – All the information in Symphony AC, including Personnel Templates, Badging Templates, real-time Events/Alarms, Photos are now stored it the SQL database. Clients now just need access to the SQL database, instead of the ‘Data’ folder share on the Server.
- Better performance and speed of I/O
- Lower chance of data corruption
Please note that these are standard instructions that should work on most systems. Some sites have domain policies that will prevent some Windows Users from performing some of the steps from this guide. If you have any issues during the installation, contact your network administrator. Any issue(s) encountered during this process is NOT covered under our standard maintenance agreement and fees may be applicable for Senstar to resolve the issue. Our Professional Services Group can assist with the conversion, please email support@Senstar.com to receive a quote.
Considerations Prior to Setup:
- Windows User Account with local admin rights is required
- Please check the applicable SQL Server pre-requisites from Microsoft
A. Creating the Database
- Log in to the computer with a Windows Account with local admin rights.
- Install SQL Server from this link:
https://www.microsoft.com/en-us/sql-server/sql-server-downloads
Additionally, download & install SQL Management Studio.
- Run SQL Management Studio and log in using Windows Authentication. (See Figure 1)
Figure 1 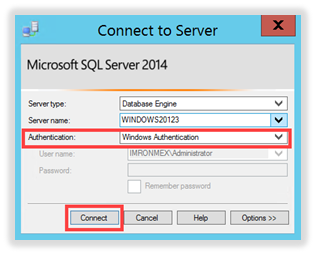
- From the ‘Object Explorer’ pane, right-click on “Database” and from the dropdown menu select “Create New Database”. (See Figure 2)
Figure 2 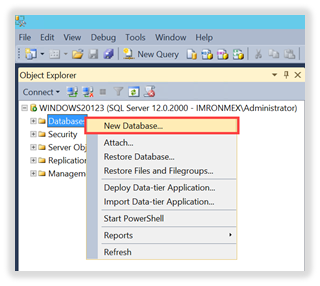
- A separate window will appear titled “New Database.” Enter a name for the database. Click ‘OK’ to create the database. (See Figure 3)
Figure 3 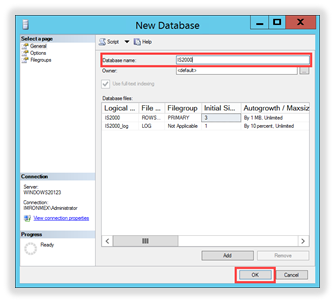
B. Creating SQL Server User
- Expand the “Security” folder, right-click on “Logins”, select “New” and click “Login…”. (See Figure 4)
Figure 4 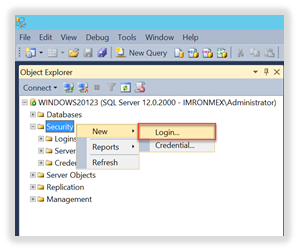
- A separate window will appear titled “Login – New”. Enter the following information in the respective tab:
a. General: (See Figure 5)
- Enter the login name.
- Select “SQL Server Authentication” and assign a password.
- Uncheck “Enforce Password Policy”.
Figure 5 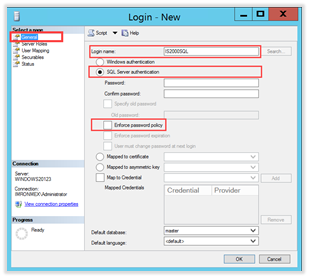
b. Server Roles: (See Figure 6)
- select “sysadmin”.
Figure 6 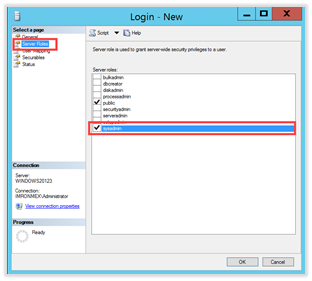
c. User Mapping: (See Figure 7)
- In the “Users mapped to this login” pane, select the database created in section A (i.e. “Symphony AC”).
- In the “Database role membership for: <database name>” pane, select “db_owner”.
Figure 7 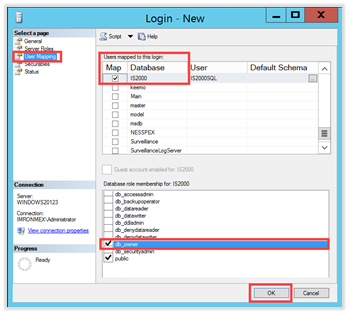 Click the “OK” button to finish. The “Login – New” window will close.
C. Configuring SQL Server to allow SQL Authentication
- Right-click on the SQL Server instance and select “Properties” located at the bottom of the drop-down menu. (See Figure 8)
Figure 8 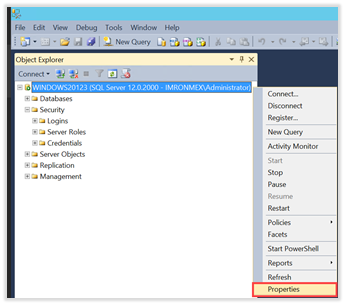
- Click on “Security” and select “SQL Server and Windows Authentication mode”. Click the “OK” button to finish. (See Figure 9)
Figure 9 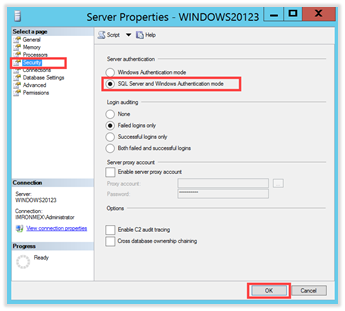
- You will receive a message informing you that the changes will not take effect until the SQL Server is restarted, click “OK” to close the message. (See Figure 10)
Figure 10 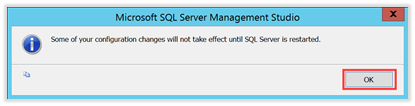
- Right-click on the SQL Server instance and from the drop-down menu select “Restart”. (See Figure 11)
Figure 11 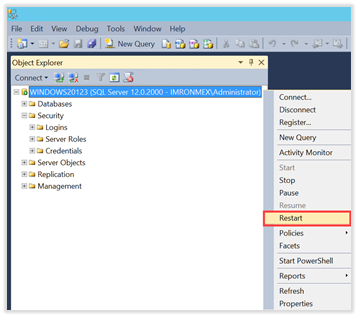
- You will receive a message to verify that you want to restart the SQL Server, click “Yes”. (See Figure 12)
Figure 12 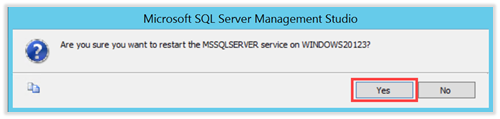
- Click the “Disconnect” button to logout of the current session. (See Figure 13)
Figure 13 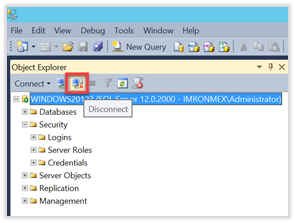
- Click the “Connect” button to open the connection window. (See Figure 14)
Figure 14 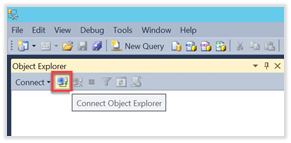
- In the “Connect to Server” window, enter the following: (See Figure 15)
- Authentication: Select “SQL Server Authentication”
- Login: Enter the user created in step 2
- Password: Enter the password for the user
- Remember password: (optional)
Figure 15 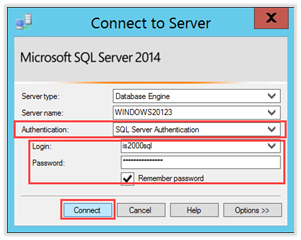 Click the “Connect” button.
D. Configuring SQL Server to Allow Remote Connections
- Start “SQL Server Configuration Manager”. (See Figure 16)
Figure 16 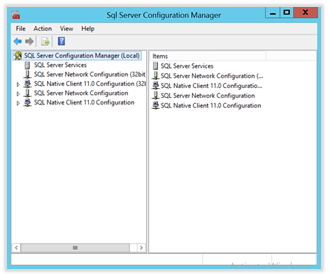
- Click on “SQL Server Network Configuration” and select “Protocols for MSSQLSERVER”. Verify the following protocols are enabled: (See Figure 17)
- Shared Memory
- Named Pipes
- TCP/IP
Figure 17 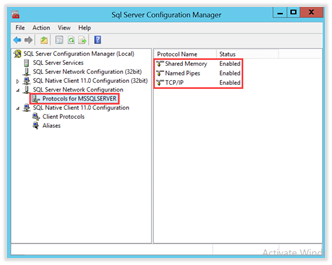
- Click on “SQL Native Client 11.0 Configuration” and select “Client Protocols”. Verify the following are enabled: (See Figure 18)
- Shared Memory
- TCP/IP
- Named Piped
Figure 18 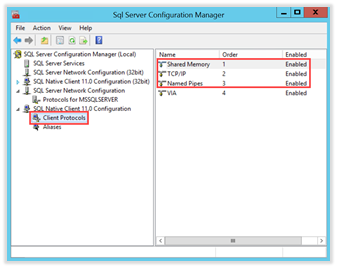 If any changes were made, restart the SQL Server instance.
- Create exceptions in any Firewall used for TCP port 1433 for the local Network.
E. Running the Access2SQL Conversion Tool
- Close Symphony AC on the Server and all Symphony AC Clients.
- From the Symphony AC Server, navigate to the Symphony AC installation and locate the “Access2SQL” application. (See Figure 19)
Figure 19 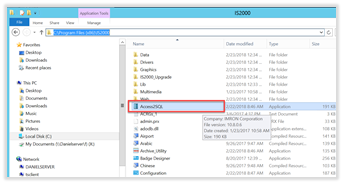
- Run the application as an admin. (See Figure 20)
Figure 20 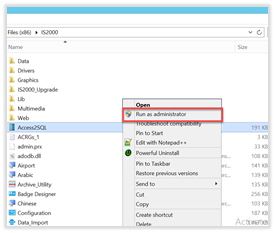
- The “SQL Server Logon” window will open. Enter the following: (See Figure 21)
- SQL Server: SQL Server Name (DESKTOP-6KSSSJG\Symphony AC) or you can use the dropdown menu to locate it.
- Authentication: SQL Server.
- User: enter the SQL User login name.
- Password: enter the SQL User password.
- Database: enter name of the database created in Section A
- Click on the arrow at the bottom to begin the conversion.
Figure 21 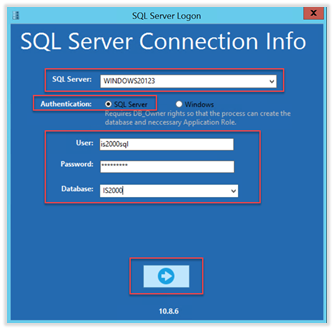
You will see the following window when the conversion is in progress (See Figure 22)
Figure 22 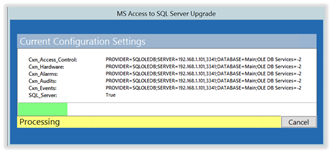
- Once the conversion completes, you will receive a notification asking you if you want to update your Symphony AC configuration with the new SQL database information. Click “Yes”.
The conversion is now completed.