Configuring a SQL Server for Remote Connections
Configuring a SQL Server for Remote Connections
Named SQL instances listen on dynamic ports and the SQL Server Browser Service informs the clients of the actual port. The SQL Browser listens on UDP 1434 and answers all client requests with the port number that is currently being utilized. SQL Server Browser service is required for both TCP and named pipes protocols. SQL Server Browser is used by clients transparently and there is no need for special configuration. Below are instructions on how to configure a SQL Server to accept remote connections. You must complete the following:
- Enable Remote Connections on the Instance of SQL Server That You Want to Connect To From a Remote Computer
- Configure SQL Server to Listen on Static Port
- Turn on the SQL Server Browser Service
- Configure the firewall to Allow Network Traffic Related to SQL Server and the SQL Server Browser Service
Preliminary Considerations: For more information on how to find the SQL Configuration Manager on your Windows PC, managing services, changing the accounts used by the services, and managing server and client network protocols, please visit: https://msdn.microsoft.com/en-us/library/ms174212.aspx Accessing the SQL Configuration Manager may vary due to your Windows version. A. Enabling Remote Connections on the Instance of SQL Server First, you will ned to enable remote connections on the instance of SQL Server that you want to connect to from a remote computer.
- Open & Login SQL Management Studio. Right-click on the server name in the Object Explorer and select “Properties” to access the Server Properties Window. (See Figure 1)
Figure 1 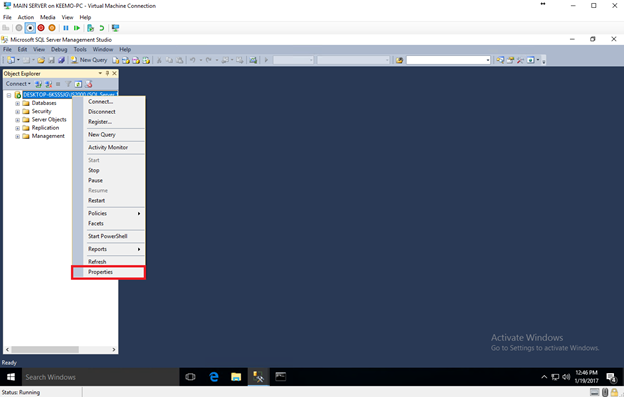
- In the left pane of the Server Properties Window, select “Connections” and under “Remote Server Connections”, check the box next to “Allow remote connections to this server.” Click OK. (See Figure 2)
Figure 2 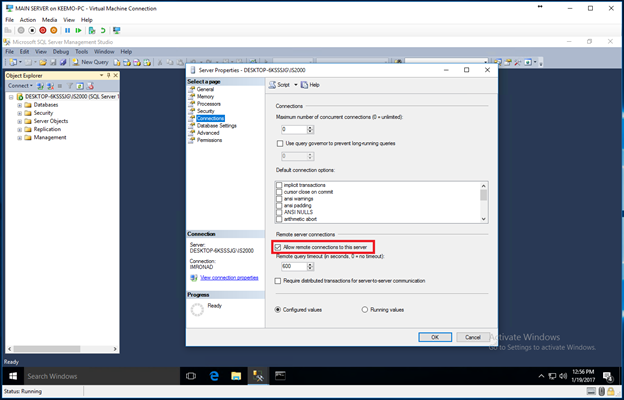 B. Configure SQL Server to Listen on Static Port
- Open the SQL Server Configuration Manager and click on “SQL Server Services” in the left pane. (See Figure 3)
Figure 3 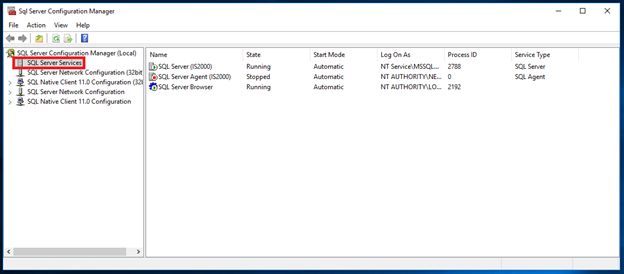
- In the center, you will see a column that lists the Process ID for each running service. Look for the Process ID in the row for the SQL Server. Identify the port that the PID is listening on by typing the following into a command prompt: netstate -ano | find /i “PID-Number_of_SQL-Server”. In the example based on figure 3, you would type the following into the command prompt: netstate –ano | find /I “NUMBER”. For an example, please see Figure 4 below.
Figure 4 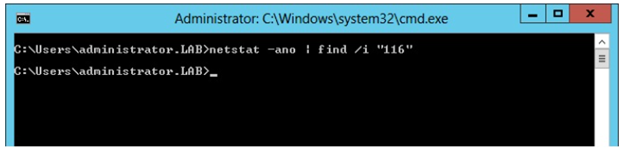
- By default, the TCP/IP protocol is disabled and must be enabled. If you do not enable the TCP/IP protocol, there will be no results from the command executed in step 2. To enable the TCP/IP protocol, go to the SQL Server Configuration manager and click on “SQL Server Network Configuration”. Right click on the “TCP/IP” protocol and select “Enable”. (See Figure 5)
Figure 5 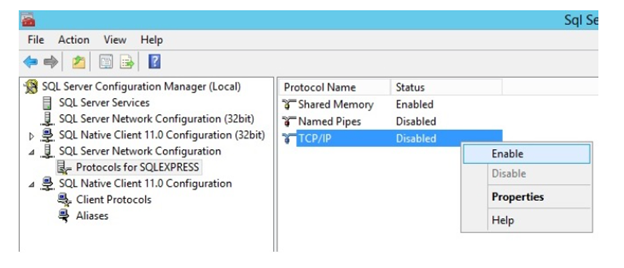
- Restart the SQL Server service and identify the Process ID assigned to the SQL Service. (See Figure 6)
Figure 6 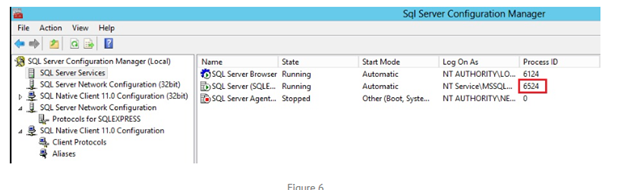
- In the command prompt, execute the following command: netstate –ano | find /i “PROCESSID”. In the example below, the command would be: netstate –ano | find /i “NUMBER”. Results should be seen as below in Figure 7.
Figure 7 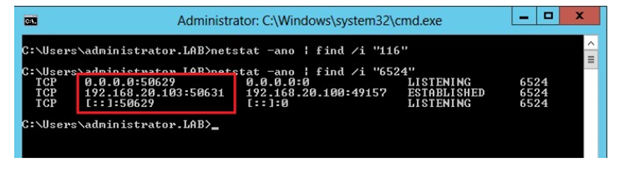
- Return to the SQL Server Configuration Manager. Click on “SQL Server Network Configuration” in the left pane and right-click the “TCP/IP” protocol and select “Properties”. Go to the “IP Addresses” tab and scroll down to the IPALL section. Remove the value for TCP Dynamic Ports (leaving it blank) and enter the port 1433 for TCP port. (See Figure 8)
Figure 8 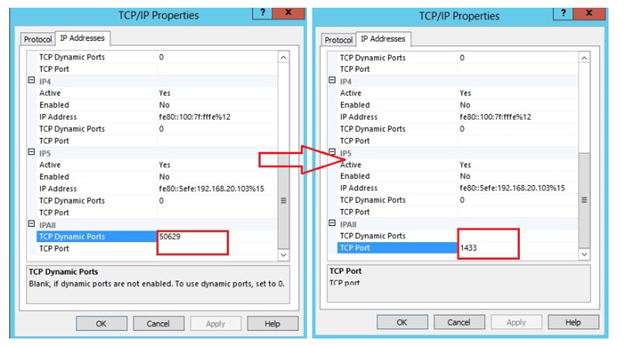
- Restart the SQL Server Service, identify the new process ID assigned to the SQL service. In the command prompt, execute the following command: netstate – ano | find /i “3948”. Results should be displayed as shown in Figure 9 below.
Figure 9 
- The SQL Express is now configured to listen on standard port 1433.
C. Turn On the SQL Server Browser Service
- Open the SQL Server Configuration Manager. Click on “SQL Server Services” in the left pane and right click on “SQL Server Browser Service” and click “Properties”. (See Figure 10)
Figure 10 
- In the SQL Server Browser Properties Window, click on the “Service” tab. Under the “Start Mode” option, change the start type to “Automatic”. Click “Apply”. (See Figure 11)
Figure 11 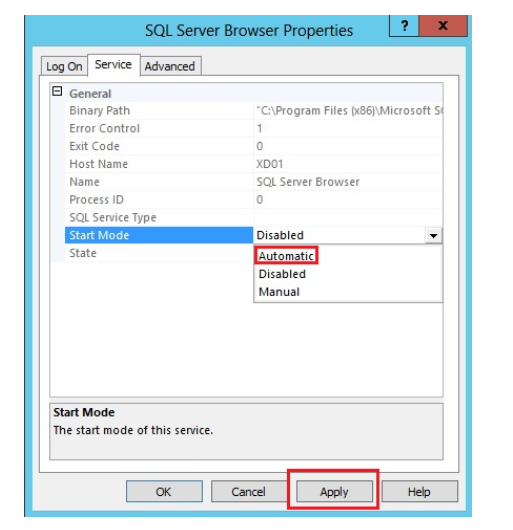
- In the SQL Server Browser Properties Window, click on the “Log On” tab. Click the “Start” button to start the SQL Browser Service. (See Figure 12)
Figure 12 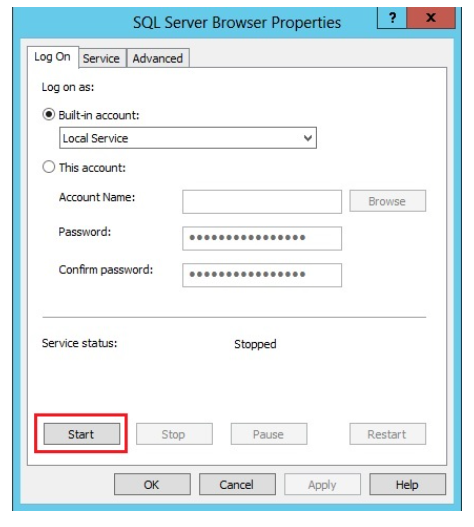
- In the SQL Server Browser, confirm that the service is running as shown in figure 13.
Figure 13 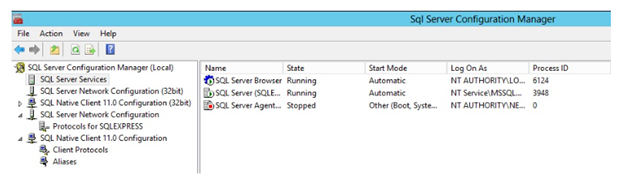 Note: According to SQL Server Hardening best practices, the SQL Server Browser service should be disabled. This service is typically not required. The SQL Server Browser service responds to requests for SQL Server resources and redirects the caller to the correct port. Keeping the Browser service disabled will remove the redirector as an attack vector, helping to obscure the correct entry ways into your SQL Server components. D. Configure the Firewall to Allow Network Traffic Related to SQL Server and the SQL Server Browser Service In Windows Firewall, four exceptions must be configured to allow access to the SQL Server.
- A port exception for TCP Port 1433. In the new Inbound Rule Wizard dialoag, use the following information to create a port exception:
- Select “Port”
- Select “TCP” and specify port “1433”
- Allow the connection
- Choose all three profiles (Domain, Private, and Public)
- Name the rule “SQL - TCP 1433”
- A port exception for UDP Port 1434. Click the New Inbound Rule Wizard dialog and use the following information to create another port exception:
- Select “Port”
- Select “UDP” and specify port “1434”
- Allow the connection
- Choose all three profiles (Domain, Private, and Public)
- Name the rule “SQL – UDP 1434”
- A program exception for exe. Click the New Inbound Rule Wizard dialog and use the following information to create a program exception:
- Select “Program”
- Click “Browse” to select “sqlserver.exe” in the following location:
C:\Program Files\Microsoft SQL Server\MSSQL11.<INSTANCENAME>\MSSQL\Binn\sqlservr.exe where <INSTANCENAME> is the name of your SQL instance.
- Allow the connection
- Choose all three profiles (Domain, Private, and Public)
- Name the rule “SQl – Sqlservr.exe”
- A program exception for exe. Click the New Inbound Rule Wizard dialog and use the following information to create another program exception:
- Select “Program”
- Click “Browse” to select sqlbrowser.exe. By default, it is located in the following location:
C:\Program Files (x86)\Microsoft SQL Server\90\Shared\sqlbrowser.exe
- Allow the connection
- Choose all three profiles (Domain, Private, and Public)
- Name the rule “SQL – sqlbrowser.exe”