Assigning Card Formats
Adding Card Formats (Aero)
A card format is a set of values used to configure a card reader to accept certain bit or data structures and facility codes. Up to eight (8) card formats can be added per Aero controller.
- From Hardware Manager unlock the pad lock to allow editing of the screen.
- Highlight the Aero Controller located in the Hardware Tree.
- From the Aero Controller's properties click on the drop down arrow to the right of the (Card Formats) tag.
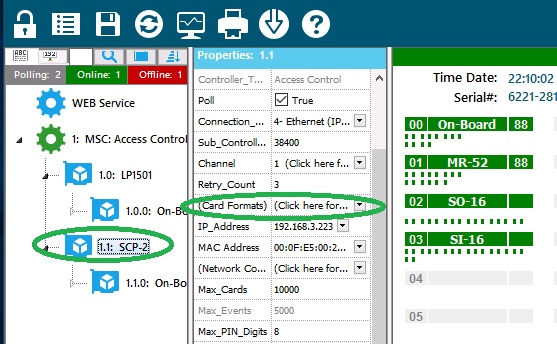
- Eight (8) tabs will be displayed allowing the operator to configure one (1) card format per tab.
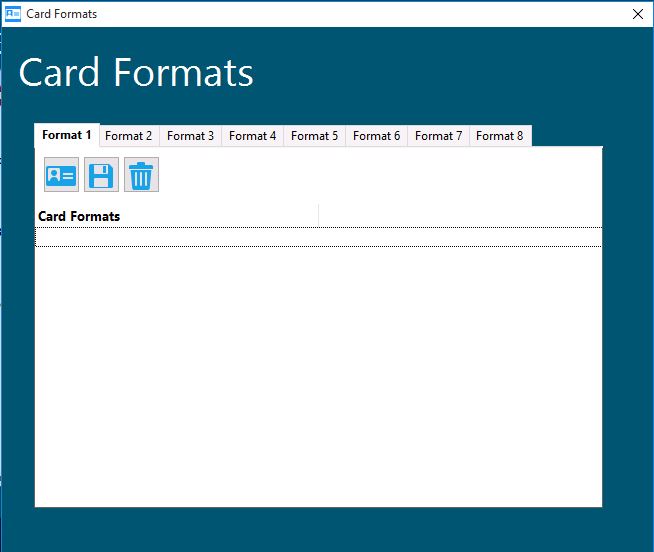
- To add a card format to 'Format 1' tab, select on the tab. The click on the card icon below that to display the list of predefined card templates. For example, to add a '26bit Standard HID' card format, simply select the 'Wiegand'>26 Bit Standard HID'
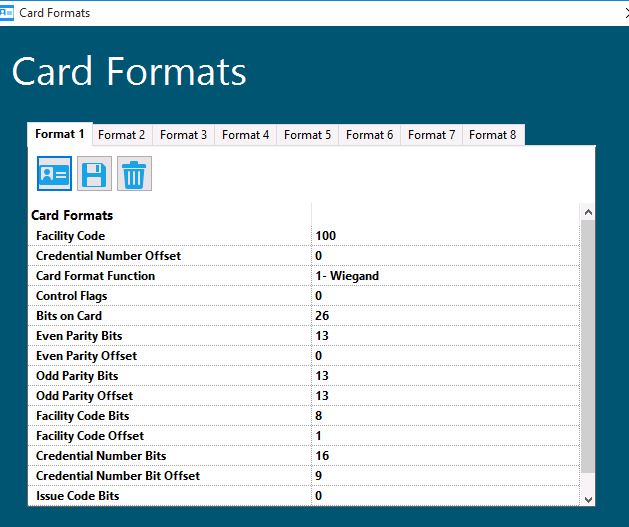
- After clicking on the Copy Card Format icon select the card type, Wiegand or Magnetic. By clicking on the card type a library of card formats will be displayed. Click on the format that matches the cards purchased.
- Once the format has been selected, the operator can make changes to any of the format fields to customize the format for the customers use. For example if using a 37 bit format with a facility code of 19 the operator would modify the 37 bit format’s facility code to reflect 19.
- Click the floppy disc to save the changes.
Adding Card Formats (Onity)
A card format is a set of values used to configure a card reader to accept certain bit or data structures and facility codes. Up to four (4) card formats can be added per Wireless Access Point (WAP) controller.
- From Hardware Manager unlock the pad lock to allow editing of the screen.
- Highlight the Aero Controller located in the Hardware Tree.
- From the WAP Controller's properties click on the drop down arrow to the right of the (Card Formats) tag.
- Four (4) tabs will be displayed allowing the operator to configure one (1) card format per tab.
- Highlight the first available tab and click on the center icon. This icon appears as a book with a magnifying glass and allows the operator to copy a card format from an existing library.
- After clicking on the Copy Card Format icon select the card type, Wiegand or Magnetic. By clicking on the card type a library of card formats will be displayed. Click on the format that matches the cards purchased.
- Once the format has been selected, the operator can make changes to any of the format fields to customize the format for the customers use. For example if using a 37 bit format with a facility code of 19 the operator would modify the 37 bit format’s facility code to reflect 19.
- Please note that the Card Format Function must be assigned correctly in order for the cards to read properly:
- 0- No Formatting
- 1- Standard Proximity
- 2- ISO1443A
- 3- ISO1443B
- 4- ISO15693
- 5- iClass HID Specific
- Click the floppy disc to save the changes.
Adding Card Formats (VertX)
The VertX hardware platform requires all bits of a card to be defined in order for the card number to be recognized. This process requires a card format be created and saved to the remote path of the Access Control Security application. The Access Control Security application contains a default set of card formats most commonly used by the industry; however, if a card format is required that is not listed please contact your Technical Support representative for assistance.
- From the Hardware Manager click on the pad lock to unlock the Hardware module.
- Highlight the VertX Access Control driver, click in the Card Formats field located in the VertX Access control Properties box.
- From the Card Formats selection box, click in the field to the right of the number to select the desired card format. Up to 255 card formats can be assigned per driver.
Note: Any newly added card formats will not take affect until a personnel download has been completed.
Assigning the Universal Format (VertX)
The universal card formats allows the customer to easily takeover existing sites and handle multiple formats without knowing specific card information about the existing cards. The Universal Format only applies to the VertX/Edge hardware and will require the use of an enrollment reader. Only one bit structure per controller can be assigned through Symphony AC.
- Unlock the module to allow editing of the screen.
- From the VertX Controller, click in the field (Bits for Universal Card Format) located in the controllers Properties box.
- From the (Bits for Universal Card Format) selection box select the desired bit structure.
- Click the disk icon to save.
Note: If the bit structure is unknown present a non programmed card to a system reader and view the event from Event Manager. The bit structure will be defined in the Access Denied: Invalid error message.
- Navigate to Access -> Personnel Manager
- Unlock the module to allow editing of the screen.
- Enter in the cardholder information.
- Enter the card number - or - Click in the Card # field and present the card to an enrollment reader. The Card # will automatically populate with the correct card number.
- Select the card format from the right of the Card # field that corresponds to the record.
- Once all cardholder information has been entered, perform a download of the Personnel Records.