|
Article Type:
|
How To
|
|
Product:
|
Symphony
|
|
Product Version:
|
|
|
Component:
|
|
|
Device Brands:
|
|
|
Created:
|
2-Apr-2014 8:21:30 AM
|
|
Last Updated:
|
|
Senstar Symphony OPC Server setup
Customer Use Case Customers wishing to integrate existing OPC-driven alarm systems with Senstar Symphony, such as SCADA, need to configure OPC to enable Symphony to function as an OPC client. Senstar Symphony OPC Server Data Access Senstar Symphony OPC Server is built on the SLIK_DA toolkit which is a product of Northern Dynamic (www.nordyn.com) used to create OPC Data Access servers and clients. - The Windows service AI AiraOPCServer is the name of the Symphony OPC Server in Symphony 6.14.
- The Windows service AI SeerOPCServer is the name of the Symphony OPC Server in Symphony 7.0.
- The Windows service AI Scheduler is what the OPC client and the Senstar Symphony OPC Server use to exchange data with each other and with other Symphony components.
What is OPC? OPC (Object Linking and Embedding/OLE for Process Control) is a set of publicly available technical standards for enabling the interoperation of automation software. OPC specifications include OPC Data Access, OPC Alarms & Events, and more. Senstar Symphony implements OPC Data Access only. OPC Data Access is originally based on Microsoft’s COM (component object model) and DCOM (distributed component object model) technologies. The COM/DCOM technologies provided the framework for software products to be developed. It is a client/server communication mechanism. Data Access Data Model A Data Access server component typically contains one OPC Server object which manages a set of OPC Item objects organized in OPC Group objects. OPC Item objects cannot be accessed directly through the OPC Data Access custom interface, but only via OPC Group objects. OPC Group objects are used to organize the OPC Clients data access. OPC Item and OPC Group objects are created by the OPC Server object on behalf of OPC Clients. One OPC Server can serve several OPC Clients. An OPC Client is implemented in a Data Access client component. 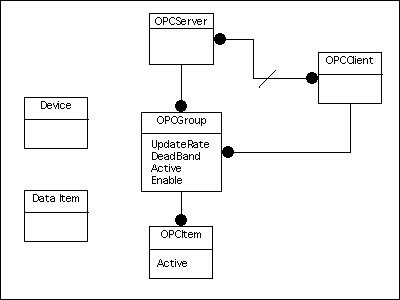
Symphony OPC Server Data Items There are two subgroups: ToAira and ToBIS. ToAira Subgroup triggers an alarm from a particular policy on the Senstar Symphony server. | Item Name | Value |
|---|
| ToAira.Policy_<policyID>.AlarmOn | integer: 0 = no alarm; > 0 means alarm |
ToBIS Subgroup sends Symphony server information to other OPC clients. | Item Name | Value |
|---|
| ToBIS.Policy_<policyID>.Disabled | integer: 0 = enabled; 1= disabled | | ToBIS.Camera_<cameraID>.AlarmType | integer: 0 = no alarm; > 0 means alarm | | ToBIS.Camera_<cameraID>.PolicyID | integer: alarm policy ID | | ToBIS.Camera_<cameraID>.Time | string: alarm time | | ToBIS.Camera_<cameraID>.ObjectType | string: alarm object type | | ToBIS.Camera_<cameraID>.ObjectX | integer: alarm object X coordinate | | ToBIS.Camera_<cameraID>.ObjectY | integer: alarm object Y coordinate | | ToBIS.ServerStatus.AI_<ServiceName>*** | Boolean: True=running, False=not running |
***<ServiceName> = AI services you see on the Senstar Symphony server in Windows Services (Services.msc) Install Symphony OPC Server Important: This procedure assumes that you already have an Senstar Symphony server running with the appropriate OPC Server license (SYM-OPC-SL) on it. In a multiple server farm environment, you must install OPC on each server in the farm, including redundancy servers, to ensure that alarms are received across all servers in the farm from all active, moved, or failed over devices. Installing the OPC Server on a virtual machine running Symphony] Server is also supported. 1.) As a Windows Administrative user, open a command prompt and navigate to:
\Symphony\_bin\ (which is typically C:\Program Files (x86)\Senstar\Symphony\_bin\) 2.) Run one of the following commands: - airaopcserver.exe -regserver for Symphony 6.14
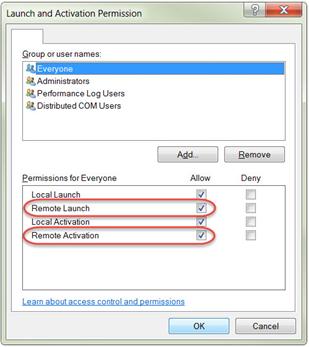
- seeropcserver.exe -regserver for Symphony 7.0
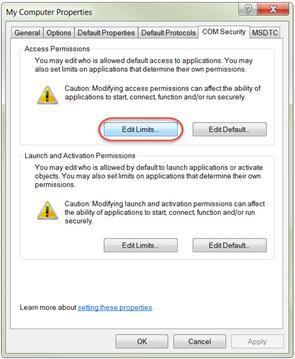
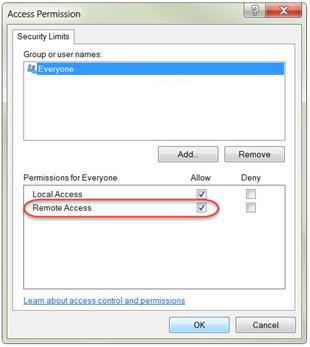
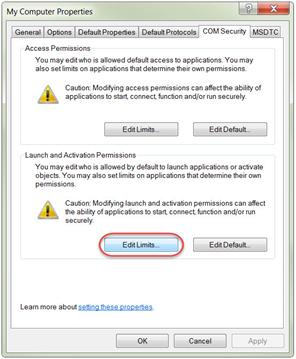
3.) Launch Component Services. (From the Start > Run menu enter dcomcnfg to launch Component Services.) 4.) Navigate through the tree to: Component Services > Computers > My Computer > DCOM Config. Right-click on the OPC server and select Properties. 5.) On the General tab set the Authentication Level to None and click OK. 6.) In Windows Services restart the AI Scheduler service. (To access Windows Services, select Windows Start > Run menu and enter Services.msc.) Note: Every time a camera device or rule is modified in Senstar Symphony, you must restart BOTH the AI Scheduler and the OPC server via Windows Services (Services.msc). Enable Remote Access to Symphony OPC Server For remote connections, the Symphony components must run with a user account (not local system) and it is suggested that the Symphony Components and OPC Client run with the same user account. For more information, see KB10063. 1.) From the Start > Run menu enter dcomcnfg to launch Component Services. 2.) Navigate through the tree to: Component Services > Computers > My Computer. 3.) Right-click on My Computer and select Properties. 4.) On the COM Security tab, click Edit Limits… for both sections (Access Permissions and Launch and Activation Permissions). Add the user group Everyone and make sure this new Everyone group has all Remote permissions enabled (as available). Click OK. | Access Permissions |
|---|
 |  |
| Launch and Activation Permissions |
|---|
 |  |
5.) Click OK again to close the My Computer Properties dialog. 6.) In Component services, navigate to Component Services > Computers > My Computer > DCOM Config. Right-click on OPC server and select Properties. 7.) On the Security tab, select the Customize option for all three sections (Launch and Activation Permissions, Access Permissions, and Configuration Permissions). For each section, click Edit… and add the Everyone user group. Make sure this new Everyone group has all Remote and Full Control permissions enabled (as available) and click OK. 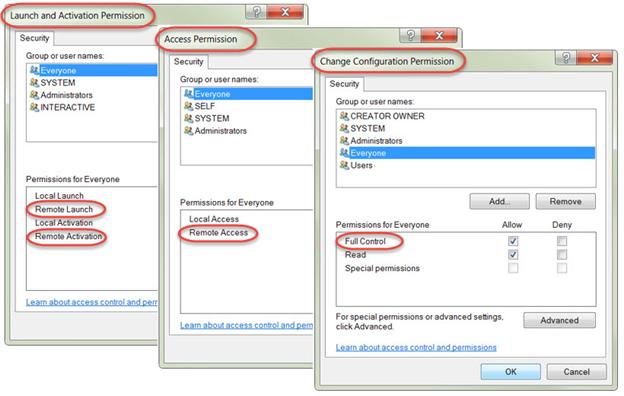
8.) When finished, click OK. 9.) Launch Windows Administrative Tools. Depending on your version of Windows there are different ways to access this. In Windows 7/Server 2008 enter Admin in the Windows > Start menu and choose Administrative Tools. NOTE: If you are using Windows 8 or Windows 8.1, you can omit the following steps. These Windows versions do not have Local Security Policy (secpol.msc) settings. Senstar OPC works on PSA with these versions. 10.) Launch the Local Security Policy. Navigate through the tree to:
Local Policies > Security Options > DCOM:Machine Launch Restrictions in Security Descriptor... Right-click and select Properties. 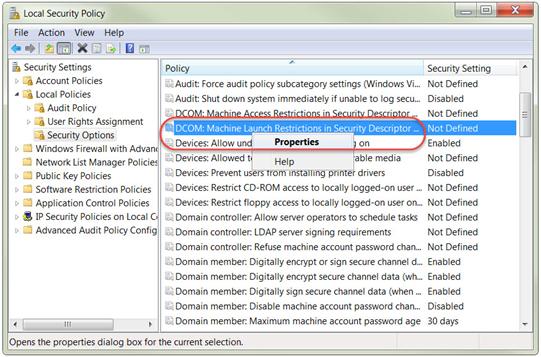
11.) On the Template Security Policy Setting choose Edit Security… 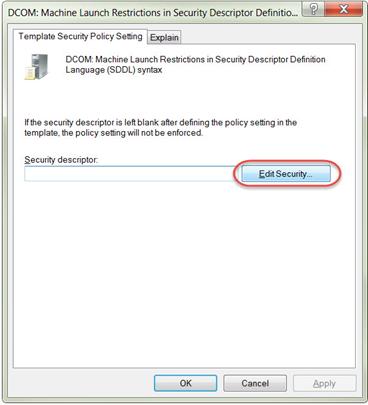
12.) Make sure the Everyone user group has all Remote permissions enabled and click OK. 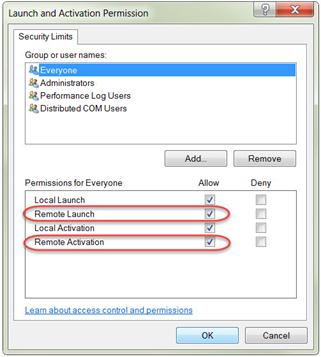
13.) Click OK to close the DCOM:Machine Launch Restrictions in Security Descriptor dialog. Test Symphony OPC Server For the following communication tests, install a copy of Softing OPC Toolbox Demo Client or Matrikon OPC Explorer. Note that softing is no longer supported by the OPC Toolbox Demo Client; however, you can request an executable from our Support and Presales team. Send Test Alarm from OPC Client to Symphony Server This alarm test example uses Softing OPC Toolbox Demo Client. The OPC Data Items subgroup .ToAira is used to trigger a specified rule in Senstar Symphony. See the section Symphony OPC Server Data Items for details. 1.) Create a new rule in Symphony and note the rule’s ID. 2.) Open the Softing OPC Toolbox Demo Client. On the OPC Servers tab, locate the OPC server. If the OPC client is installed on the same machine as the Symphony server, the OPC server will be under: Local > Data Access V2 > OPC Server for BIS using Aira2005. 
Note: If the OPC client is remote to the Symphony server then you will need to locate it under the section Remote > Server’s Name > OPC Server for BIS using Aira2005. 3.) Double click OPC Server for BIS using Aira2005 to add it to the left panel. 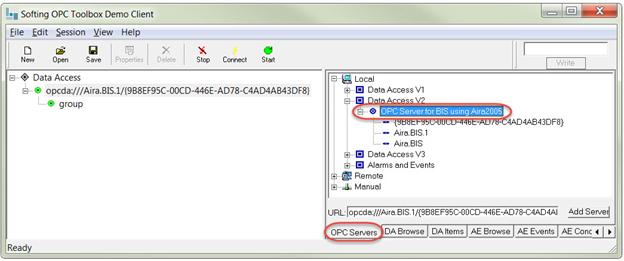
4.) Select the DA Browse tab (at the bottom of the screen). Expand the ToAira tree until you find Policy_xx, where xx is your rule ID from Step 1. 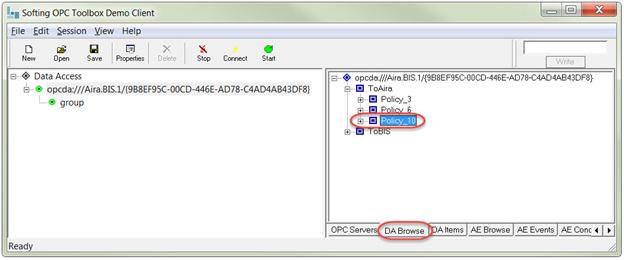
5.) Expand Policy_xx and double-click on the AlarmOn option to add it to the panel on the left. 
6.) Select the DA Items tab (at the bottom of the screen). Make sure the ToAira.Policy_xx.AlarmOn component is selected on the left side of the screen. In the top right-hand corner of the screen there is a Write option. Enter 1 in this box then click Write. This will cause Symphony to trigger an alarm from the rule. 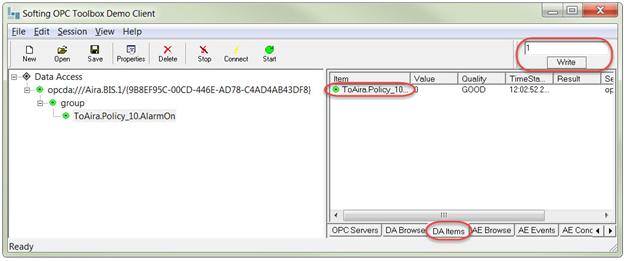
7.) Verify that you get an alarm in Symphony from your rule. Test Return Information from Symphony Server in OPC Client This test example reads whether a rule (policy) is disabled and assumes that you have already sent a test alarm that was detected correctly in Symphony. This test example uses Softing OPC Toolbox Demo Client. The OPC Data Items subgroup .ToBIS is used to send Symphony server information to other OPC clients. See the section Symphony OPC Server Data Items for details. 1.) Open the Softing OPC Toolbox Demo Client and locate the OPC Server. If the OPC client is installed on the same machine as the Symphony server, the OPC Server will be under: Local > Data Access V2 > OPC Server for BIS using Aira2005. 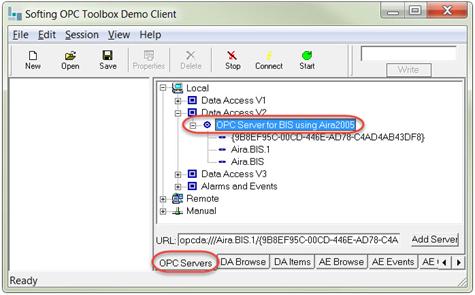
Note: If the OPC client is remote to the Symphony server then you will need to locate it under the section Remote > Server’s Name > OPC Server for BIS using Aira2005. 2.) Double click OPC Server for BIS using Aira2005 to add it to the left panel. 
3.) Select the DA Browse tab (at the bottom of the screen). Expand the ToBIS tree until you find Policy_xx (where xx is your rule ID.) 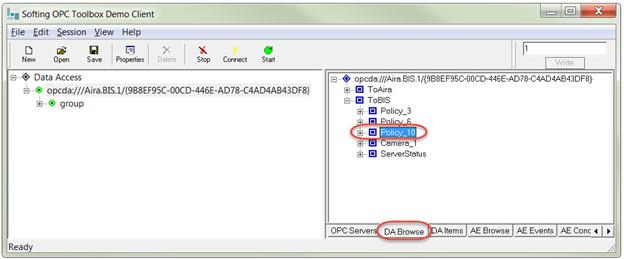
4.) Expand Policy_xx and double-click on the Disabled option to add it to the panel on the left. 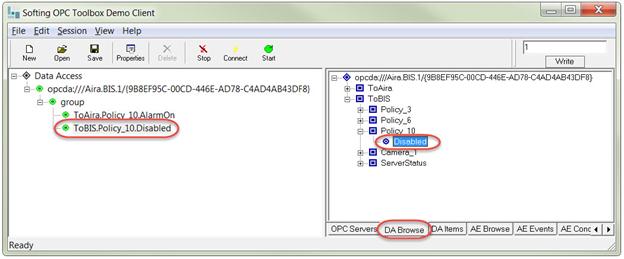
5.) Select the DA Items tab (at the bottom of the screen), and read the current value. Right now the value is 0 meaning the rule is enabled. 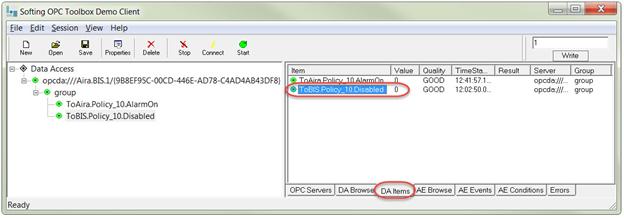
6.) In Symphony select Server > Configuration > Rules, select your OPC Test rule, click Disable, and click OK. 7.) Wait approximately 5 seconds and the OPC Client will read the value from Symphony again. The new value should be 1 which indicates that the policy is disabled. 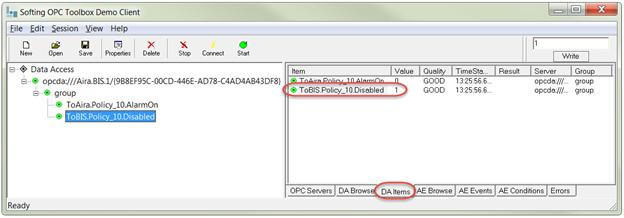
Trigger Alarm in Symphony & Push Data to OPC Client Once you have tested communication between Senstar Symphony and the OPC client, you can configure Symphony to interact with the OPC server on alarm for a specific alarm type. 1.) In the Symphony Client, select a rule for a camera whose Alarm Type you want to modify. 2.) In the Symphony Rule Wizard, select 3:Action > OPC tab. Enable the Notify OPC when Alarmed option, enable the Notify OPC when Alarmed option, and click Save. 3.) Restart both the AI SchedulerOPC and the OPC server services via Microsoft® Windows® Services (Services.msc). 4.) In the OPC client, go to the DA Browse tab and add the ToAira.Policy_xx.AlarmOn (where xx is your Symphony rule ID). 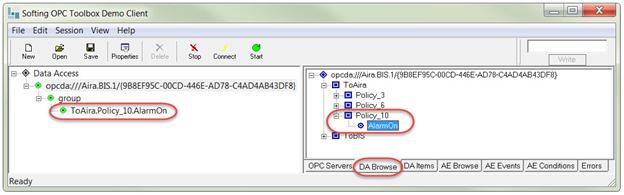
5.) On the DA Browse tab, right-click on the ToBIS section of the tree and select Add items for all tags to add all of the tags from ToBis to the left-hand panel on the screen. 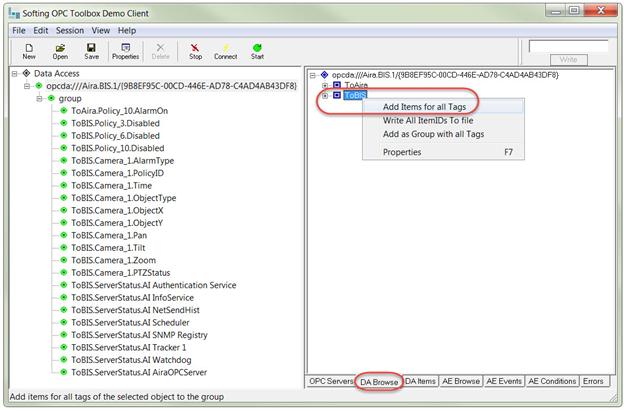
6.) On the DA Items tab, select the ToAira.Policy_xx.AlarmOn (where xx is your rule ID). In the top-right corner of the OPC client screen, enter a value in the Write field and then click Write. 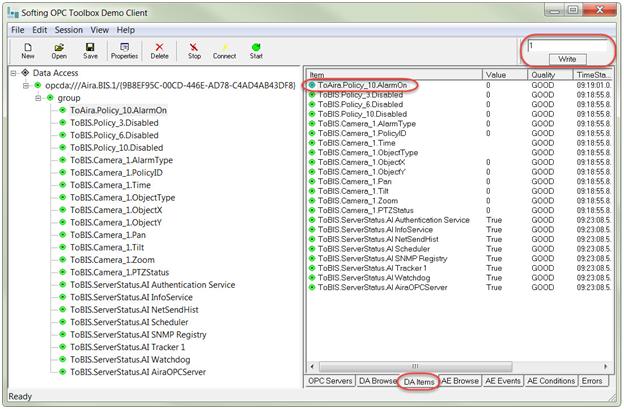
An alarm occurs in Symphony on the camera with the rule modification. In the OPC client, the value 37 briefly appears for ToBis.Camera_xx.AlarmType (where xx is your camera ID in Symphony), and other values will be filled in from the alarm including .ObjectType and .Time. You can experiment by adding other .ToBIS values and see the OPC Client read them from Symphony.
|
Average rating:
|
|
|
|
Please log in to rate.
|
|
Rated by 3, Viewed by 10475
|
|